> ## Documentation Index
> Fetch the complete documentation index at: https://docs.imagine.art/llms.txt
> Use this file to discover all available pages before exploring further.
# Canvas Interface
> Navigate the Workflows canvas, add and connect nodes, organize your workspace, and run your first workflow.
The **Canvas Interface** is the central space where you create, manage, and fine-tune your workflows. It provides a visual layout of connected nodes so you can see exactly how your tasks relate to each other—and modify, run, or monitor them at any point.
## Building your first workflow
Go to [imagine.art/flow](https://www.imagine.art/flow) and create a new workflow, or open an existing one from your dashboard.
Click **Nodes** in the left sidebar to open the node library. You can also right-click or double-click anywhere on the canvas to open it in place.
Browse by category or search for a node by name, then click it to place it on the canvas.
Click the node to select it. The **right sidebar** displays the node's settings and the available AI models for that node type. Set your model, parameters (resolution, aspect ratio, seed, etc.), and any required inputs.
Add additional nodes as needed for your pipeline. To connect two nodes, click and drag from an **output handle** (right side of a node) to a compatible **input handle** (left side of another node), then release to form the connection.
Connections are type-safe: image handles connect only to image handles, text to text, and video to video.
Click the **Run** button inside a node, or select nodes and click **Run Selected** in the right sidebar. You can also press `Ctrl/Cmd + Enter` to run the selected nodes. The workflow processes each node in sequence, so you can run just part of your pipeline.
Review the output, adjust prompts or settings, and re-run. Workflows are designed for iteration—tweak any node and re-run without rebuilding from scratch.
## Canvas navigation
**Panning**
* Hold `Space` and drag.
* Scroll the mouse wheel, drag with the **middle mouse button**, or use a **two-finger drag** on a trackpad.
**Zooming**
* Hold `Ctrl/Cmd` and scroll, or use a pinch gesture on a trackpad.
* Click the zoom percentage in the bottom-left corner of the canvas for zoom options, including **Zoom to fit**.
* You can zoom out as far as **1%** and in as far as **200%**. The dotted grid stays visible at every zoom level.
**Minimap**
Click the map icon in the bottom-left corner to show the **Minimap**. It gives you an overview of your full canvas layout, useful for large workflows with many nodes.
For more detail, see [Canvas Navigation](/workflows/canvas-navigation).
## Adding and managing nodes
| Action | How to do it |
| - | - |
| Add a node | Click **Nodes** in the left sidebar, or right-click or double-click the canvas |
| Search for a node | Press `Cmd/Ctrl + K` or click **Search** in the left sidebar |
| Move a node | Click and drag it to the desired position |
| Duplicate a node | Select it and press `Ctrl/Cmd + D` |
| Delete a node | Select it and press `Delete` or `Backspace` |
## Connecting and removing handles
**To connect a handle:** Drag from an output slot on the right side of a node to a compatible input slot on the left side of another node. Release to form the connection.
**To remove a handle:** Hover over the connection handle—an **×** button appears. Click it to disconnect, or select the connection and press `Delete` or `Backspace`.
If a connection snaps back when you release, the two handles are incompatible types. Check that you're connecting an image output to an image input, text to text, or video to video.
## Left sidebar and bottom toolbar
The sidebar on the left side of the canvas gives you access to **Content**, **Nodes**, **Search**, **Assets**, and **Presets**.
The toolbar at the bottom of the canvas holds your editing tools:
| Button | Function |
| - | - |
| **Select** | Select and move nodes. Hold `Space` to pan |
| **Remove edges** / **Connection** | Cut connections, or switch to drawing connections |
| **Image**, **Video**, **Audio**, **Text** | Add a node of that type |
| **Ad Maker** | Add an Ad Maker node |
| **Section** | Add organizational sections to group related nodes together |
| **Sticky notes, shapes, and more** | Add stickers, shapes, sticky notes, text, and drawings |
| **Upload file** | Upload media to the canvas |
## Right sidebar
When you select a node (or multiple nodes), the right sidebar shows settings specific to that selection:
* **Node properties and model settings** — Configure parameters for the selected node.
* **Model selection** — Choose from available AI models. Settings like aspect ratio, resolution, and other parameters update dynamically based on the model you select.
* **Number of runs** — Specify how many times the selected node(s) should execute per run.
* **Run Selected** — Execute only the selected nodes with their current settings.
## Version History
Workflows save your canvas automatically as you work. Version History lets you browse past states of your canvas and roll back to an earlier one, so you can experiment freely without worrying about losing work.
The panel groups versions into two lists:
* **Auto Saved Versions**: the most recent automatic saves.
* **Saved Versions**: versions you saved yourself. Click the cloud icon (**Save Workflow**) next to the workflow name to save one.
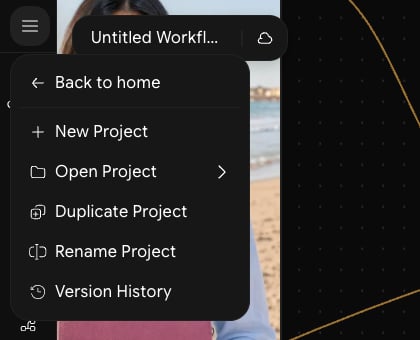
**To access Version History:**
Click the menu icon in the top-left corner of the editor, then select **Version History**.
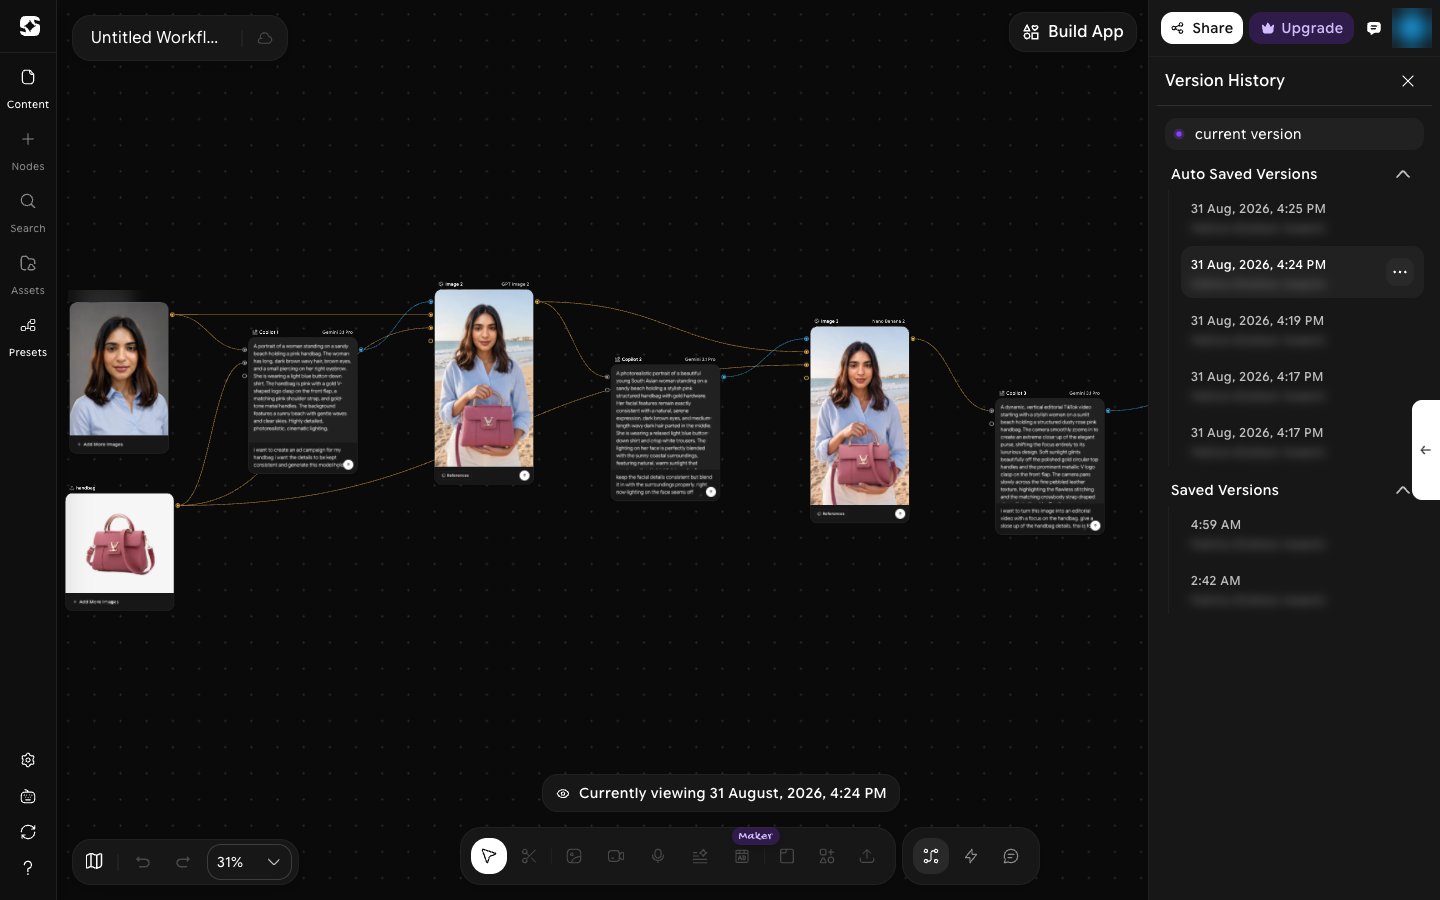
 The **Version History** panel opens on the right. Each entry shows when it was saved and who saved it. Click an entry to preview that version on the canvas. A **Currently viewing** label at the bottom of the canvas shows which version you're looking at, and the editing tools are disabled while you preview.
To go back to your latest canvas, click **current version** at the top of the panel.
The **Version History** panel opens on the right. Each entry shows when it was saved and who saved it. Click an entry to preview that version on the canvas. A **Currently viewing** label at the bottom of the canvas shows which version you're looking at, and the editing tools are disabled while you preview.
To go back to your latest canvas, click **current version** at the top of the panel.
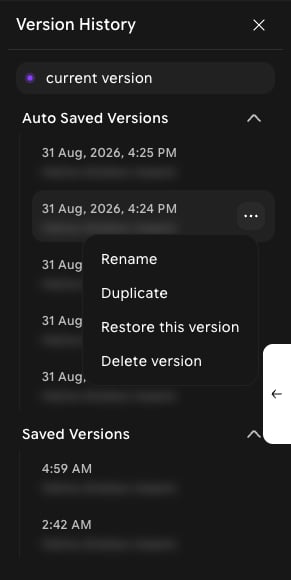
 Click **⋯** next to an entry to open its menu:
* **Rename**: give the version a name.
* **Duplicate**: make a copy of the version.
* **Restore this version**: roll the canvas back to this version.
* **Delete version**: remove the version from the history.
Click **⋯** next to an entry to open its menu:
* **Rename**: give the version a name.
* **Duplicate**: make a copy of the version.
* **Restore this version**: roll the canvas back to this version.
* **Delete version**: remove the version from the history.
 To close the panel, click **×** next to the **Version History** heading.
## Draw on Canvas
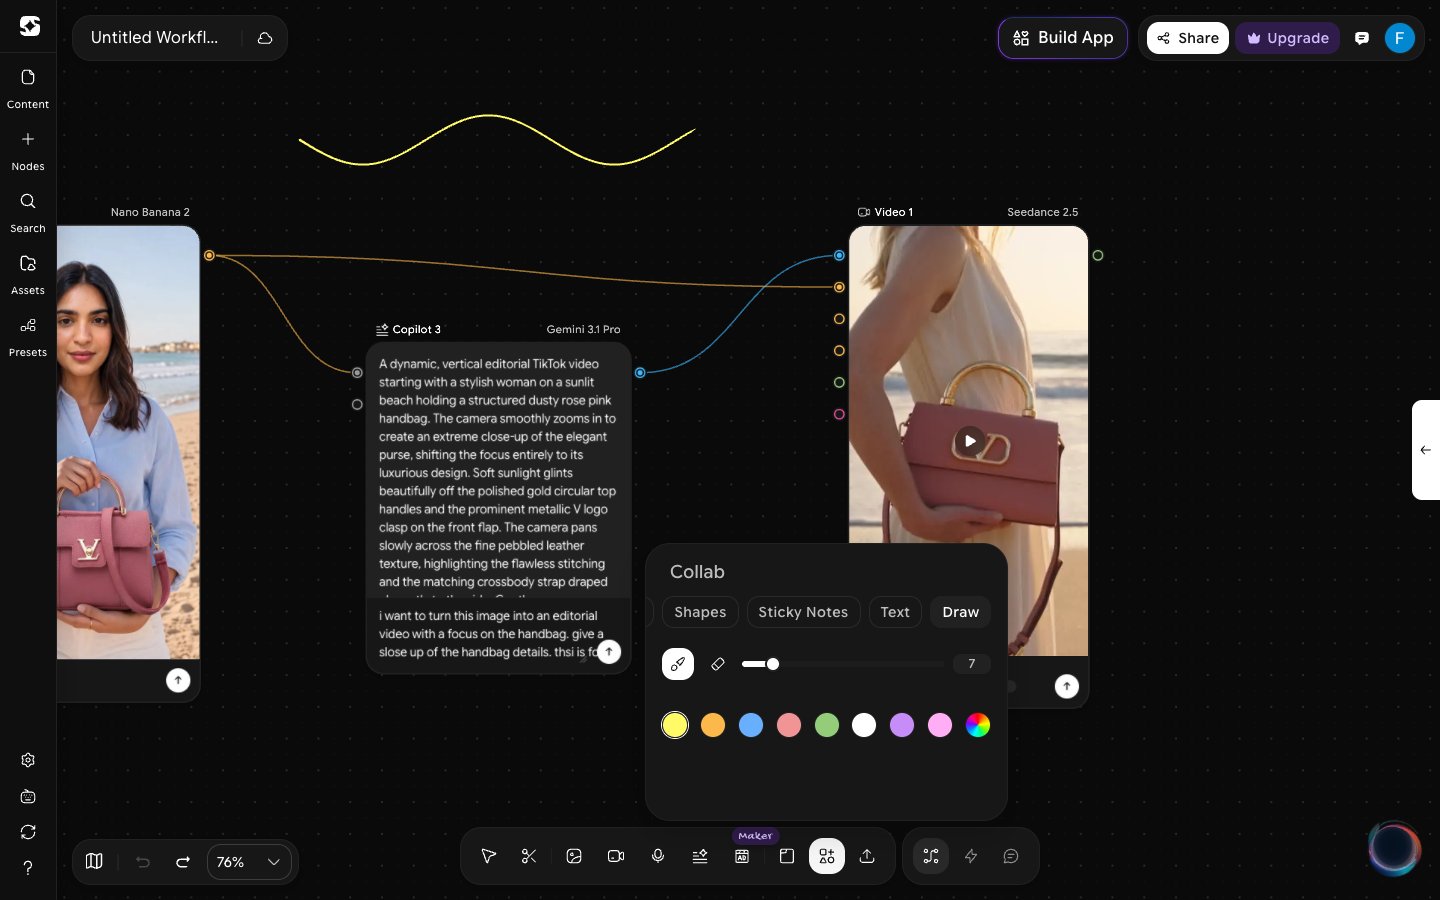
You can sketch, annotate, and ideate directly on the workflow canvas without leaving the platform. Drawing is free-form — use it to mark up connections, diagram ideas, or leave visual notes for collaborators.
**To start drawing:**
Click **Sticky notes, shapes, and more** in the bottom toolbar to open the **Collab** panel, then select the **Draw** tab. Choose the pen, set the stroke size with the slider, and pick a color.
To close the panel, click **×** next to the **Version History** heading.
## Draw on Canvas
You can sketch, annotate, and ideate directly on the workflow canvas without leaving the platform. Drawing is free-form — use it to mark up connections, diagram ideas, or leave visual notes for collaborators.
**To start drawing:**
Click **Sticky notes, shapes, and more** in the bottom toolbar to open the **Collab** panel, then select the **Draw** tab. Choose the pen, set the stroke size with the slider, and pick a color.
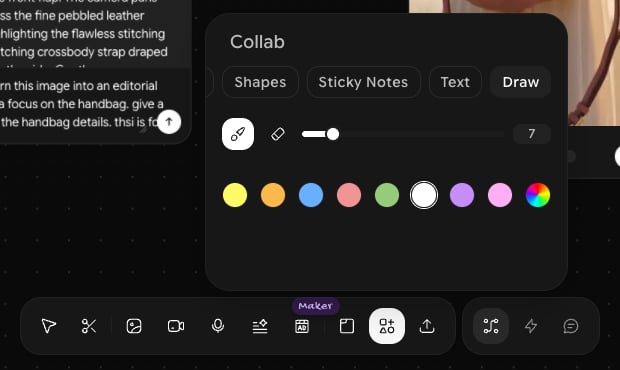 Click and drag anywhere on the canvas to draw freely.
 Select the eraser icon in the **Draw** tab and drag over the strokes you want to remove.
## Organizing your workspace
Use **Section** (from the bottom toolbar) to group related nodes into labeled containers. This keeps large workflows readable and makes it easy to identify different stages of a pipeline—for example, separating a "Generation" section from a "Post-processing" section.
You can also use **Sticky notes, shapes, and more** (stickers, shapes, sticky notes, text, and drawings) to annotate your canvas with explanations or design decisions, which is useful when sharing workflows with teammates.
## Keyboard shortcuts
| Shortcut | Action |
| - | - |
| `Ctrl/Cmd + Enter` | Run the selected nodes |
| Double-click or right-click | Open the node library on the canvas |
| `Cmd/Ctrl + K` | Search for a node |
| `Ctrl/Cmd + D` | Duplicate selected node |
| `Delete` / `Backspace` | Delete selected node or connection |
| `T` / `P` | Add a Prompt node |
| `C` | Add a Copilot node |
| `Ctrl/Cmd + Plus` / `Ctrl/Cmd + Minus` | Zoom in / Zoom out |
See [Keyboard Shortcuts](/workflows/keyboard-shortcuts) for the full list.
This documentation is built and hosted on [Mintlify](https://mintlify.com), a developer documentation platform.
Select the eraser icon in the **Draw** tab and drag over the strokes you want to remove.
## Organizing your workspace
Use **Section** (from the bottom toolbar) to group related nodes into labeled containers. This keeps large workflows readable and makes it easy to identify different stages of a pipeline—for example, separating a "Generation" section from a "Post-processing" section.
You can also use **Sticky notes, shapes, and more** (stickers, shapes, sticky notes, text, and drawings) to annotate your canvas with explanations or design decisions, which is useful when sharing workflows with teammates.
## Keyboard shortcuts
| Shortcut | Action |
| - | - |
| `Ctrl/Cmd + Enter` | Run the selected nodes |
| Double-click or right-click | Open the node library on the canvas |
| `Cmd/Ctrl + K` | Search for a node |
| `Ctrl/Cmd + D` | Duplicate selected node |
| `Delete` / `Backspace` | Delete selected node or connection |
| `T` / `P` | Add a Prompt node |
| `C` | Add a Copilot node |
| `Ctrl/Cmd + Plus` / `Ctrl/Cmd + Minus` | Zoom in / Zoom out |
See [Keyboard Shortcuts](/workflows/keyboard-shortcuts) for the full list.
This documentation is built and hosted on [Mintlify](https://mintlify.com), a developer documentation platform.