> ## Documentation Index
> Fetch the complete documentation index at: https://docs.imagine.art/llms.txt
> Use this file to discover all available pages before exploring further.
# Imagine MCP
> Connect ImagineArt to ChatGPT, Claude, Claude Code, Cursor, Grok, Manus, Codex, Hermes, OpenClaw, and any MCP client — no API key, billed through your existing imagine.art credits.
Imagine MCP connects ImagineArt to **ChatGPT, Claude, Claude Code, Cursor, Grok, Manus, Codex, Hermes, OpenClaw**, and any client that speaks the Model Context Protocol. Use ImagineArt's full set of creative tools — image, video, music, fashion, ads, and more — with no API key, billed through your existing imagine.art credits.
By the end of setup, you can tell your agent "Generate an image of a red bicycle at sunset" and get the finished media back in the conversation.
To open the setup page, click **ImagineArt MCP** in the app sidebar, or go to `https://www.imagine.art/mcp`. Pick your client at the top of the page. The **MCP** tab shows chat and IDE clients; the **CLI** tab shows terminal clients. Each client has a **Connect In** button and a **How To Connect?** guide.
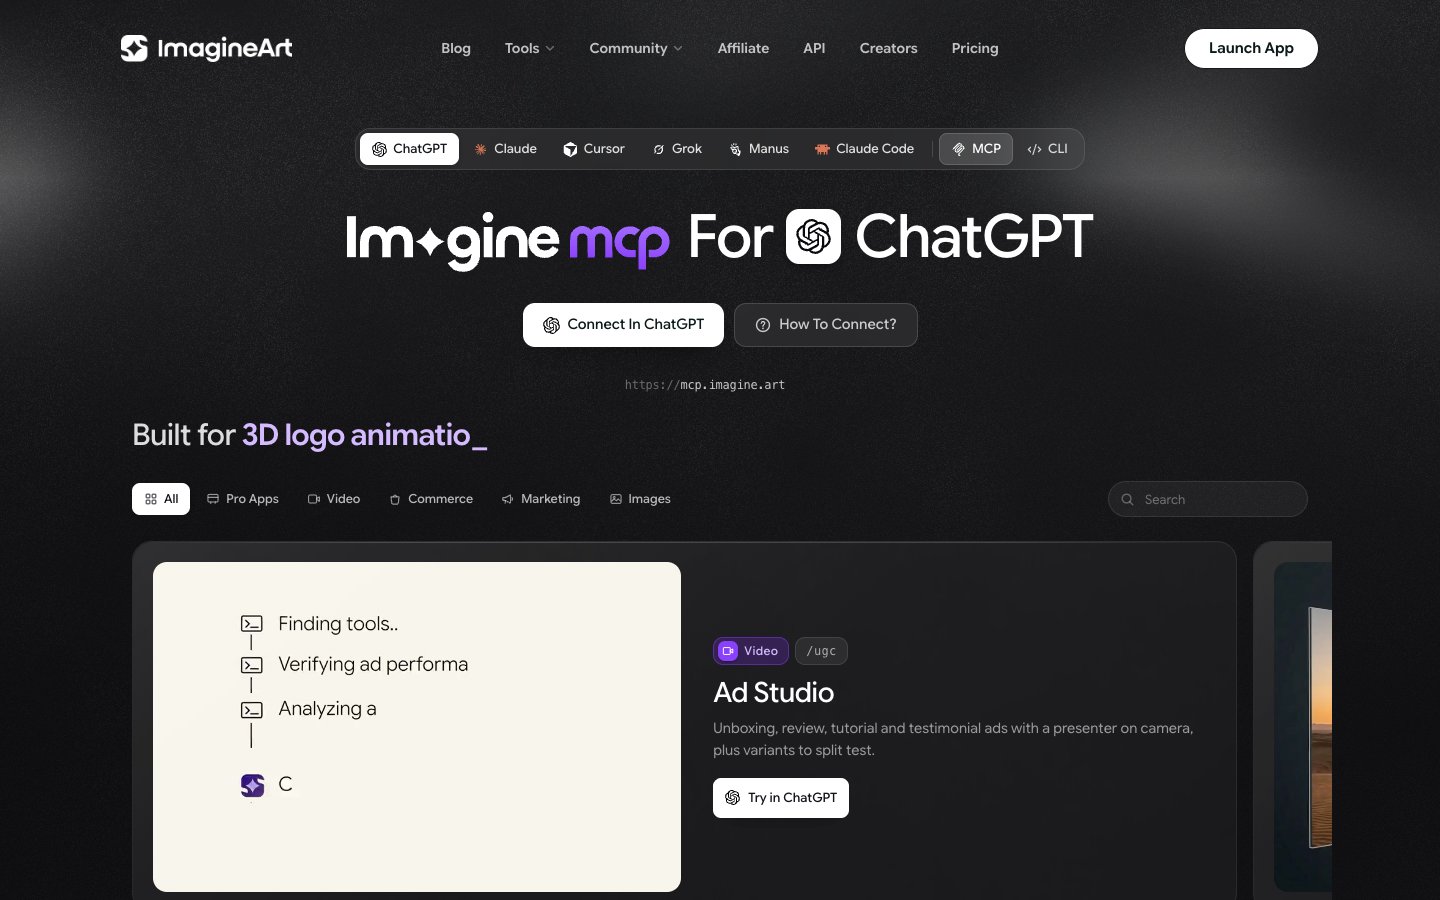 ChatGPT and Manus list ImagineArt in their own plugin and connector directories, so there's no URL to paste. See [ChatGPT](#chatgpt) and [Manus](#manus).
In your client, add a custom MCP server pointing to `https://mcp.imagine.art`.
Sign in with your imagine.art account when prompted — no API key.
Ask your agent to create something. Generations draw from your existing credits.
## What is MCP?
**MCP (Model Context Protocol)** is an open standard that lets an AI agent connect to external tools. ImagineArt runs a hosted MCP server; your AI client (Claude, Cursor, and so on) acts as the host that connects to it.
When you register the ImagineArt server, its creative tools appear as native tools your agent can call. The connection is:
* **Hosted** — the server lives at `https://mcp.imagine.art`. There's nothing to run or install.
* **Authenticated by your account** — you sign in with your imagine.art login over OAuth. Your agent opens a browser once to sign in, and the credentials stay on your own machine. There is no API key to generate, store, or rotate.
* **Billed through your credits** — no separate MCP pricing. The free tier includes 100 credits/day.
Two addresses, don't mix them up. `https://www.imagine.art/mcp` is the **information page** you read in a browser. `https://mcp.imagine.art` is the **server endpoint** that goes into your client's setup. Use the server endpoint for setup.
## Why Imagine MCP
Most creative MCP servers require API keys, separate billing, and credential management across platforms. Imagine MCP skips all of that.
* **No API key needed** — every request authenticates through your imagine.art account.
* **Every tool in one connection** — image, video, music, upscaling, background removal, fashion, and ad generation are all reachable through a single server, so you can chain them in one conversation.
* **Uses your current balance** — runs on the same credit system as the platform; your existing plan and balance carry over with no extra charges.
* **Your work lands in your workspace** — everything you generate through your agent is saved to your ImagineArt workspace, so you can find, reuse, or delete it later. See [Security and privacy](#security-and-privacy).
## What you can build
Tell your agent what you're working on and it picks the right tools, chains them together, and delivers production-ready results without you leaving the conversation. Generate an image, upscale it, strip its background, then feed it into a video tool. Shoot a model in an outfit, then animate the still into a campaign clip. Turn a product photo into a finished ad — all in one agent session.
### Use-case gallery
The **Built for** section of the MCP page is a gallery of ready-made use cases. Filter it by **All**, **Pro Apps**, **Video**, **Commerce**, **Marketing**, or **Images**, or search it. Each card has a **Try in ChatGPT** button that opens ChatGPT with the prompt filled in, and a **Copy prompt** button so you can paste the prompt into any other client.
ChatGPT and Manus list ImagineArt in their own plugin and connector directories, so there's no URL to paste. See [ChatGPT](#chatgpt) and [Manus](#manus).
In your client, add a custom MCP server pointing to `https://mcp.imagine.art`.
Sign in with your imagine.art account when prompted — no API key.
Ask your agent to create something. Generations draw from your existing credits.
## What is MCP?
**MCP (Model Context Protocol)** is an open standard that lets an AI agent connect to external tools. ImagineArt runs a hosted MCP server; your AI client (Claude, Cursor, and so on) acts as the host that connects to it.
When you register the ImagineArt server, its creative tools appear as native tools your agent can call. The connection is:
* **Hosted** — the server lives at `https://mcp.imagine.art`. There's nothing to run or install.
* **Authenticated by your account** — you sign in with your imagine.art login over OAuth. Your agent opens a browser once to sign in, and the credentials stay on your own machine. There is no API key to generate, store, or rotate.
* **Billed through your credits** — no separate MCP pricing. The free tier includes 100 credits/day.
Two addresses, don't mix them up. `https://www.imagine.art/mcp` is the **information page** you read in a browser. `https://mcp.imagine.art` is the **server endpoint** that goes into your client's setup. Use the server endpoint for setup.
## Why Imagine MCP
Most creative MCP servers require API keys, separate billing, and credential management across platforms. Imagine MCP skips all of that.
* **No API key needed** — every request authenticates through your imagine.art account.
* **Every tool in one connection** — image, video, music, upscaling, background removal, fashion, and ad generation are all reachable through a single server, so you can chain them in one conversation.
* **Uses your current balance** — runs on the same credit system as the platform; your existing plan and balance carry over with no extra charges.
* **Your work lands in your workspace** — everything you generate through your agent is saved to your ImagineArt workspace, so you can find, reuse, or delete it later. See [Security and privacy](#security-and-privacy).
## What you can build
Tell your agent what you're working on and it picks the right tools, chains them together, and delivers production-ready results without you leaving the conversation. Generate an image, upscale it, strip its background, then feed it into a video tool. Shoot a model in an outfit, then animate the still into a campaign clip. Turn a product photo into a finished ad — all in one agent session.
### Use-case gallery
The **Built for** section of the MCP page is a gallery of ready-made use cases. Filter it by **All**, **Pro Apps**, **Video**, **Commerce**, **Marketing**, or **Images**, or search it. Each card has a **Try in ChatGPT** button that opens ChatGPT with the prompt filled in, and a **Copy prompt** button so you can paste the prompt into any other client.
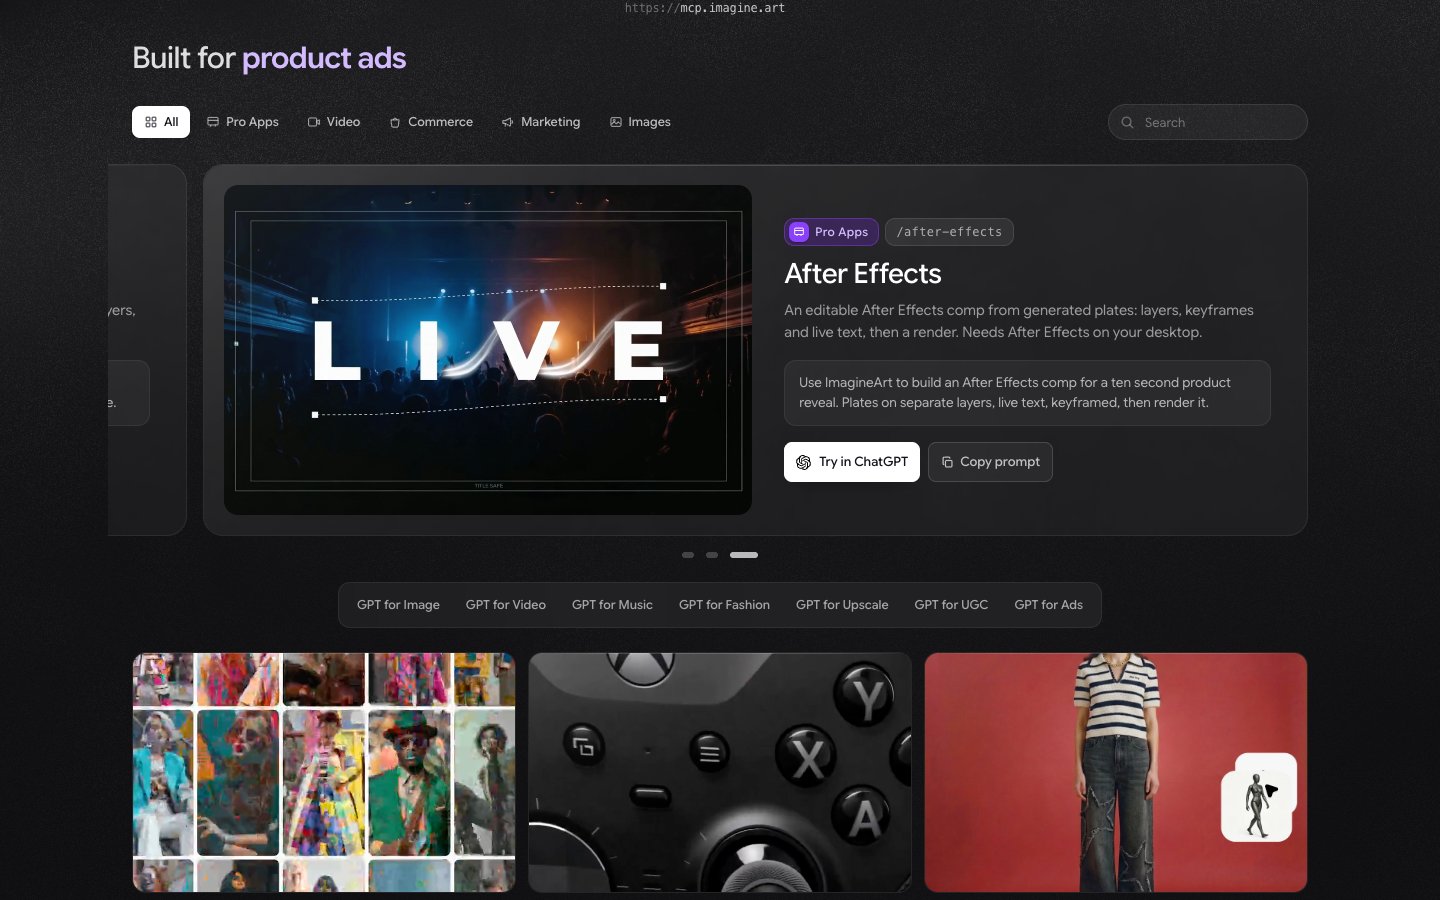 | Use case | Category | What it makes |
| - | - | - |
| Ad Studio | Video | Unboxing, review, tutorial, and testimonial ads with a presenter on camera, plus variants to split test |
| Fashion Studio | Commerce | Photoshoots and runway |
| Try-On | Commerce | Garments on real models |
| Product Studio | Commerce | Product and listing shots |
| Effects | Video | Photo to viral video |
| Motion | Video | Cinematic camera moves |
| Brand Studio | Marketing | Logos and brand identity |
| Social Studio | Marketing | Posts, covers, captions |
| Sound | Marketing | Music and soundtracks |
| Canva Finishing | Marketing | Editable Canva designs |
| Spaces | Images | Room redesign and staging |
| Retoucher | Images | Edit and enhance images |
| Studio | Images | Raw generation and assets |
| Photoshop | Pro Apps | A layered PSD with separate layers, masks, and editable type |
| After Effects | Pro Apps | An editable After Effects comp with layers, keyframes, and live text, then a render |
| Blender | Pro Apps | Editable 3D scenes and renders |
| Premiere | Pro Apps | Premiere sequence assembly |
**Photoshop** and **After Effects** need the desktop app installed on your computer.
For example, the **Product Studio** card's prompt is:
> Use ImagineArt to build a marketplace listing set for a stainless steel tumbler: white background hero, three lifestyle scenes and a cutout PNG.
Below the gallery, the **GPT for Image**, **GPT for Video**, **GPT for Music**, **GPT for Fashion**, **GPT for Upscale**, **GPT for UGC**, and **GPT for Ads** links open pages about using ImagineArt for each job inside ChatGPT.
## Supported models
One connection gives your agent access to ImagineArt's image, video, audio, and avatar models. The MCP page lists **PixVerse, Veo, Kling 3, Seedance, Runway, Hailuo, Wan, Luma, Seedream, Flux, Nano Banana Pro**, and **Midjourney**. Each tool has a default model; ask your agent for a specific one if you want it.
## Available tools
Imagine MCP has 96 tools, all native MCP tools your agent can call directly in the conversation. Seven cover most of what people ask for. The rest are tuned to specific jobs, plus tools that manage the products, avatars, models, and wardrobes those jobs draw on.
### Seven core tools
| Tool | What it does |
| - | - |
| Text-to-image | Generate images from a prompt at multiple resolutions |
| Text-to-video | Generate short clips from a prompt or a reference image |
| Music generation | Produce original music or instrumentals from a prompt |
| Fashion photoshoots | Compose a model, wardrobe, scene, and pose into finished photos |
| Image upscaler | Enhance and increase the resolution of an image |
| Background remover | Cleanly strip the background from an image |
| Balance inquiry | Check your remaining credits and renewal date |
### Guided studio workflows
Beyond the core tools, two full multi-step workflows are available — each walks your agent through a short setup, then generates a polished, production-ready result:
* **Fashion Studio** — compose a model, wardrobe, scene, and pose into a finished photoshoot, or animate a still into a campaign video. See [Fashion Studio](#fashion-studio) below.
* **Ad Studio** — turn a product and an avatar into a finished ad, image or video, using a format, hook, and setting. See [Ad Studio](#ad-studio) below.
### Specialized creative tools
Purpose-built recipes that combine the core engines into polished, ready-to-use outputs:
* **Logo generation** — clean, scalable brand marks
* **3D logo animation** — turn a flat logo into a cinematic reveal
* **Cinematic product ad** — animate a product photo into a commercial clip
* **Giant product showcase** — surreal building-scale product hero shot
* **UGC lifestyle try-on** — authentic influencer-style product photos
* **Instagram post** — scroll-stopping hero image with caption and hashtags
* **YouTube thumbnail** — high-CTR 16:9 thumbnail with overlay guidance
* **Interior design** — redesign a room from a photo or a concept
* **Jewelry video** — luxury macro product commercial
* **Cooking video** — turn a person's photo into a tutorial clip
* **Drone/aerial video** — sweeping flyover, orbit, and top-down shots
### Workflow and account helpers
* **Upload images** — bring your own reference assets into a generation
* **List generations/uploaded assets** — browse what you've made
* **Select organization and folder** — choose the workspace and where outputs are saved
## Fashion Studio
Fashion Studio is a guided, multi-step workflow for AI fashion photoshoots and fashion videos — model, wardrobe, scene, and pose composed into finished editorial or catalogue shots, or animated into short campaign clips.
Ask your agent for a fashion shoot — for example, "Generate me a Fashion post."
Your agent walks through organization → shoot type → project, then model → wardrobe → background → pose.
It generates the shoot and shows you the results. From there you can animate any still into a video.
### How it works
Fashion Studio shares one setup, then splits into two branches:
* **Shared setup:** organization → shoot type (editorial or catalogue) → project
* **Photoshoot branch:** model → wardrobe (outfit + footwear/accessories, optional) → background (optional) → pose (optional) → generate
* **Video branch:** pick a finished still → template or free-text motion → camera movement (optional) → duration/aspect/resolution → generate
| Step | What it does |
| - | - |
| Fashion model | Select an existing AI model, or create one from your own reference photos |
| Wardrobe | Select an outfit (top/bottom or dress) and, optionally, footwear or accessories |
| Background and pose | Choose a scene and pose — or shoot at a plain root with no background selected |
| Generate photoshoot | Compose model + wardrobe + scene + pose into finished photos |
| Animate to video | Turn any finished still into a short clip using an editorial or catalog template |
| Composite shoot | Merge multiple stills (for example, the same model across shots) into one reconciled frame |
Generating a photoshoot or a composite requires an active (paid) subscription. Free-tier organizations can browse and set up a project, but generation needs an upgrade.
### Example workflow
> Create an editorial lookbook shot: put the navy blazer and the white sneakers on my "Studio Model 1," in a soft daylight loft setting, 4:3.
The agent walks org → shoot type → project (reusing your existing project if you have one), then model, wardrobe, and background selection, then generates the shoot and shows the results. Ask it to "turn that into a 6-second campaign clip" afterward and it animates the still using a matching video template.
## Ad Studio
Ad Studio turns a product photo (or an existing product) into a finished ad — image or video — by chaining together a product, an avatar, a format, and an optional hook and setting.
Ask your agent to create an ad — for example, "Make a UGC-style ad for my water bottle."
It walks you through picking (or adding) a product and an avatar, then a format, hook, and setting.
Confirm resolution, aspect ratio, and duration, and it generates the ad.
### The pipeline
Ads are generated through a sequential setup: organization → marketing project → product → avatar → format → hook → setting → generate.
| Step | What it does |
| - | - |
| Marketing project | The campaign container the ad is linked to — pick an existing one or create a new one |
| Product | Pick an existing product, or add one by uploading a photo or pasting a product URL |
| Avatar | Pick an existing AI avatar, or create one from a text prompt or reference photos |
| Format | The ad type — for example, UGC, testimonial, unboxing. Skipped if you already named a format |
| Hook and setting | Optional — an opening hook and a scene/setting for the ad |
| Generate | Compose everything into the finished ad, at your chosen resolution, aspect ratio, and duration |
Resolution, aspect ratio, and duration are all required before generating — confirm each first so credits aren't spent on an unintended output.
### Example workflow
> Create a testimonial-style ad for my ceramic mug using my "Sarah" avatar, 9:16, 1080p, 10 seconds.
The agent resolves the mug as your product and Sarah as your avatar, matches "testimonial" to its format, confirms the hook/setting, then generates the ad at the specs you gave.
## Passing parameters and references
You control each generation through a few simple parameters. You don't pass these as raw code — just describe them to your agent (for example, "make it 16:9, 4K, using the veo model") and it maps them to the right tool.
### Common parameters
| Parameter | Applies to | Notes |
| - | - | - |
| Prompt | All generators | The text description of what to create |
| Model | Image/video | Each tool has a default; you can request a specific model |
| Aspect ratio | Image/video | For example, 1:1, 16:9, 9:16 — invalid values fall back to a supported one |
| Resolution | Image/video | Images: 1K/2K/4K. Video: 480p–4K (model-dependent) |
| Duration | Video, music | In seconds; supported lengths vary by model |
### Using references
* **By URL** — pass the URL of an existing image as a reference.
* **By upload** — upload your own image(s) directly and use them as references.
* **Multiple references** — for video, you can supply more than one reference image (and on some models, reference video or audio) to guide the result.
## Example workflows
Each example is just what you'd type to your agent.
**A single image**
> Generate an image of a red bicycle at sunset, 16:9, 4K.
The agent calls text-to-image and returns the finished image in the conversation.
**Chain tools into a product hero shot**
> Generate a sleek matte-black water bottle on a marble surface, then upscale it and remove the background.
Image → upscale → background removal, all in one session, ending with a transparent PNG ready to drop into a design.
**Turn your own photo into an ad**
> Here's my product photo — turn it into a 6-second cinematic ad with a luxury mood.
Upload the reference, then the cinematic product-ad tool animates it into a commercial clip.
**Build a mini brand kit**
> Create a minimal wordmark logo for "Northwind Coffee", then animate it into a 3D reveal.
Logo generation → 3D logo animation, producing both a static mark and a motion intro.
**Shoot and animate a fashion look**
> Put this jacket on a model for an editorial shoot, then turn the best still into a 6-second campaign clip.
Fashion Studio composes the shoot, then animates the chosen still using a matching video template.
**Build a UGC-style ad from a product photo**
> Here's my product — create a UGC-style ad with an avatar, 9:16, 15 seconds.
Ad Studio resolves the product and avatar, applies the UGC format, and generates the finished vertical ad.
## How to connect
There are three ways to connect, depending on your client:
* **From a directory** — in ChatGPT and Manus, ImagineArt is listed in the client's own plugin or connector directory. Install it and sign in; there's nothing to paste.
* **As a custom connector** — in Claude and Grok, paste the server URL `https://mcp.imagine.art` into the client's connector settings.
* **With one command** — the `@imagineartofficial/mcp` npm package includes an installer that writes the server into your client's config for you:
```bash theme={null}
npm i -g @imagineartofficial/mcp
imagine install
```
`imagine install` sets up eleven clients: Claude, Claude Code, Cursor, Codex, VS Code, Windsurf, Cline, Gemini CLI, Hermes, OpenClaw, and Grok. It opens your browser once so you can sign in.
### Let your agent set it up
Each client on the MCP page has a **Copy and send this to** box with a ready-made setup prompt. Click **Copy**, paste it into your agent, and it installs and connects Imagine MCP for you. For example, the Claude Code prompt is:
```text theme={null}
Set up ImagineArt for me so I can generate images, video and music from here.
1. Install the CLI: run npm i -g @imagineartofficial/mcp.
2. Add the server to Claude Code: run imagine install claude-code. It opens my browser to sign in: tell me when it needs me, and wait. If it stops because something is missing, install that and run it again.
3. Tell me it is ready, and what I need to type in Claude Code to pick up the new config.
```
The prompt for other clients is the same, with the client's name and its `imagine install` value swapped in: `chatgpt`, `claude`, `claude-code`, `cursor`, `grok`, `manus`, `codex`, `hermes`, `openclaw`, or `cli` for a plain terminal.
### ChatGPT
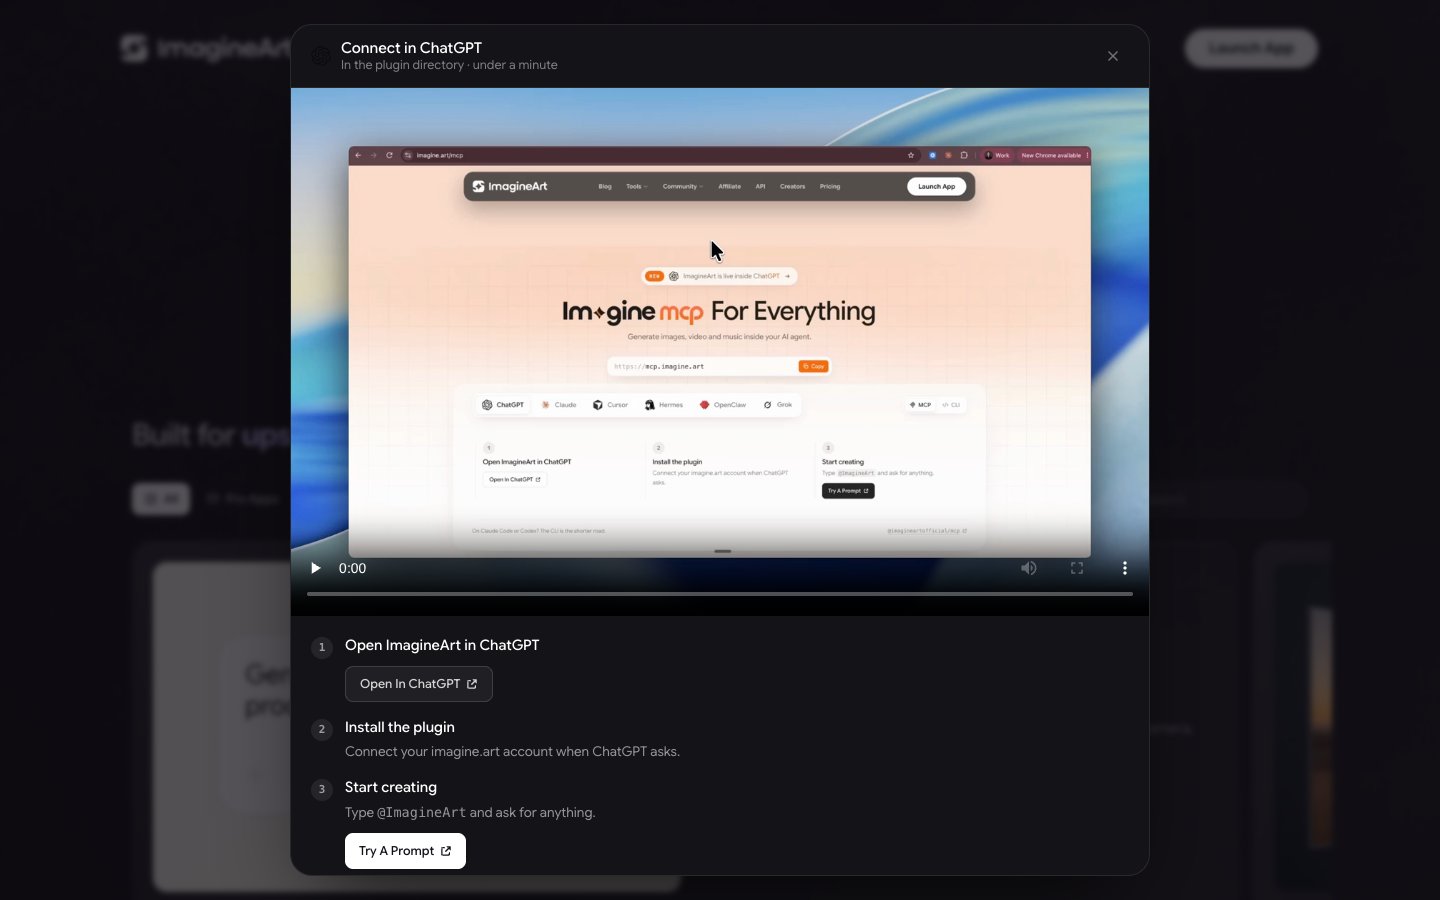
ImagineArt is in the ChatGPT plugin directory, so there's no URL to paste.
On the MCP page, select **ChatGPT** and click **Connect In ChatGPT**. This opens the ImagineArt plugin in ChatGPT.
Install the plugin, then connect your imagine.art account when ChatGPT asks.
Type `@ImagineArt` and ask for anything.
| Use case | Category | What it makes |
| - | - | - |
| Ad Studio | Video | Unboxing, review, tutorial, and testimonial ads with a presenter on camera, plus variants to split test |
| Fashion Studio | Commerce | Photoshoots and runway |
| Try-On | Commerce | Garments on real models |
| Product Studio | Commerce | Product and listing shots |
| Effects | Video | Photo to viral video |
| Motion | Video | Cinematic camera moves |
| Brand Studio | Marketing | Logos and brand identity |
| Social Studio | Marketing | Posts, covers, captions |
| Sound | Marketing | Music and soundtracks |
| Canva Finishing | Marketing | Editable Canva designs |
| Spaces | Images | Room redesign and staging |
| Retoucher | Images | Edit and enhance images |
| Studio | Images | Raw generation and assets |
| Photoshop | Pro Apps | A layered PSD with separate layers, masks, and editable type |
| After Effects | Pro Apps | An editable After Effects comp with layers, keyframes, and live text, then a render |
| Blender | Pro Apps | Editable 3D scenes and renders |
| Premiere | Pro Apps | Premiere sequence assembly |
**Photoshop** and **After Effects** need the desktop app installed on your computer.
For example, the **Product Studio** card's prompt is:
> Use ImagineArt to build a marketplace listing set for a stainless steel tumbler: white background hero, three lifestyle scenes and a cutout PNG.
Below the gallery, the **GPT for Image**, **GPT for Video**, **GPT for Music**, **GPT for Fashion**, **GPT for Upscale**, **GPT for UGC**, and **GPT for Ads** links open pages about using ImagineArt for each job inside ChatGPT.
## Supported models
One connection gives your agent access to ImagineArt's image, video, audio, and avatar models. The MCP page lists **PixVerse, Veo, Kling 3, Seedance, Runway, Hailuo, Wan, Luma, Seedream, Flux, Nano Banana Pro**, and **Midjourney**. Each tool has a default model; ask your agent for a specific one if you want it.
## Available tools
Imagine MCP has 96 tools, all native MCP tools your agent can call directly in the conversation. Seven cover most of what people ask for. The rest are tuned to specific jobs, plus tools that manage the products, avatars, models, and wardrobes those jobs draw on.
### Seven core tools
| Tool | What it does |
| - | - |
| Text-to-image | Generate images from a prompt at multiple resolutions |
| Text-to-video | Generate short clips from a prompt or a reference image |
| Music generation | Produce original music or instrumentals from a prompt |
| Fashion photoshoots | Compose a model, wardrobe, scene, and pose into finished photos |
| Image upscaler | Enhance and increase the resolution of an image |
| Background remover | Cleanly strip the background from an image |
| Balance inquiry | Check your remaining credits and renewal date |
### Guided studio workflows
Beyond the core tools, two full multi-step workflows are available — each walks your agent through a short setup, then generates a polished, production-ready result:
* **Fashion Studio** — compose a model, wardrobe, scene, and pose into a finished photoshoot, or animate a still into a campaign video. See [Fashion Studio](#fashion-studio) below.
* **Ad Studio** — turn a product and an avatar into a finished ad, image or video, using a format, hook, and setting. See [Ad Studio](#ad-studio) below.
### Specialized creative tools
Purpose-built recipes that combine the core engines into polished, ready-to-use outputs:
* **Logo generation** — clean, scalable brand marks
* **3D logo animation** — turn a flat logo into a cinematic reveal
* **Cinematic product ad** — animate a product photo into a commercial clip
* **Giant product showcase** — surreal building-scale product hero shot
* **UGC lifestyle try-on** — authentic influencer-style product photos
* **Instagram post** — scroll-stopping hero image with caption and hashtags
* **YouTube thumbnail** — high-CTR 16:9 thumbnail with overlay guidance
* **Interior design** — redesign a room from a photo or a concept
* **Jewelry video** — luxury macro product commercial
* **Cooking video** — turn a person's photo into a tutorial clip
* **Drone/aerial video** — sweeping flyover, orbit, and top-down shots
### Workflow and account helpers
* **Upload images** — bring your own reference assets into a generation
* **List generations/uploaded assets** — browse what you've made
* **Select organization and folder** — choose the workspace and where outputs are saved
## Fashion Studio
Fashion Studio is a guided, multi-step workflow for AI fashion photoshoots and fashion videos — model, wardrobe, scene, and pose composed into finished editorial or catalogue shots, or animated into short campaign clips.
Ask your agent for a fashion shoot — for example, "Generate me a Fashion post."
Your agent walks through organization → shoot type → project, then model → wardrobe → background → pose.
It generates the shoot and shows you the results. From there you can animate any still into a video.
### How it works
Fashion Studio shares one setup, then splits into two branches:
* **Shared setup:** organization → shoot type (editorial or catalogue) → project
* **Photoshoot branch:** model → wardrobe (outfit + footwear/accessories, optional) → background (optional) → pose (optional) → generate
* **Video branch:** pick a finished still → template or free-text motion → camera movement (optional) → duration/aspect/resolution → generate
| Step | What it does |
| - | - |
| Fashion model | Select an existing AI model, or create one from your own reference photos |
| Wardrobe | Select an outfit (top/bottom or dress) and, optionally, footwear or accessories |
| Background and pose | Choose a scene and pose — or shoot at a plain root with no background selected |
| Generate photoshoot | Compose model + wardrobe + scene + pose into finished photos |
| Animate to video | Turn any finished still into a short clip using an editorial or catalog template |
| Composite shoot | Merge multiple stills (for example, the same model across shots) into one reconciled frame |
Generating a photoshoot or a composite requires an active (paid) subscription. Free-tier organizations can browse and set up a project, but generation needs an upgrade.
### Example workflow
> Create an editorial lookbook shot: put the navy blazer and the white sneakers on my "Studio Model 1," in a soft daylight loft setting, 4:3.
The agent walks org → shoot type → project (reusing your existing project if you have one), then model, wardrobe, and background selection, then generates the shoot and shows the results. Ask it to "turn that into a 6-second campaign clip" afterward and it animates the still using a matching video template.
## Ad Studio
Ad Studio turns a product photo (or an existing product) into a finished ad — image or video — by chaining together a product, an avatar, a format, and an optional hook and setting.
Ask your agent to create an ad — for example, "Make a UGC-style ad for my water bottle."
It walks you through picking (or adding) a product and an avatar, then a format, hook, and setting.
Confirm resolution, aspect ratio, and duration, and it generates the ad.
### The pipeline
Ads are generated through a sequential setup: organization → marketing project → product → avatar → format → hook → setting → generate.
| Step | What it does |
| - | - |
| Marketing project | The campaign container the ad is linked to — pick an existing one or create a new one |
| Product | Pick an existing product, or add one by uploading a photo or pasting a product URL |
| Avatar | Pick an existing AI avatar, or create one from a text prompt or reference photos |
| Format | The ad type — for example, UGC, testimonial, unboxing. Skipped if you already named a format |
| Hook and setting | Optional — an opening hook and a scene/setting for the ad |
| Generate | Compose everything into the finished ad, at your chosen resolution, aspect ratio, and duration |
Resolution, aspect ratio, and duration are all required before generating — confirm each first so credits aren't spent on an unintended output.
### Example workflow
> Create a testimonial-style ad for my ceramic mug using my "Sarah" avatar, 9:16, 1080p, 10 seconds.
The agent resolves the mug as your product and Sarah as your avatar, matches "testimonial" to its format, confirms the hook/setting, then generates the ad at the specs you gave.
## Passing parameters and references
You control each generation through a few simple parameters. You don't pass these as raw code — just describe them to your agent (for example, "make it 16:9, 4K, using the veo model") and it maps them to the right tool.
### Common parameters
| Parameter | Applies to | Notes |
| - | - | - |
| Prompt | All generators | The text description of what to create |
| Model | Image/video | Each tool has a default; you can request a specific model |
| Aspect ratio | Image/video | For example, 1:1, 16:9, 9:16 — invalid values fall back to a supported one |
| Resolution | Image/video | Images: 1K/2K/4K. Video: 480p–4K (model-dependent) |
| Duration | Video, music | In seconds; supported lengths vary by model |
### Using references
* **By URL** — pass the URL of an existing image as a reference.
* **By upload** — upload your own image(s) directly and use them as references.
* **Multiple references** — for video, you can supply more than one reference image (and on some models, reference video or audio) to guide the result.
## Example workflows
Each example is just what you'd type to your agent.
**A single image**
> Generate an image of a red bicycle at sunset, 16:9, 4K.
The agent calls text-to-image and returns the finished image in the conversation.
**Chain tools into a product hero shot**
> Generate a sleek matte-black water bottle on a marble surface, then upscale it and remove the background.
Image → upscale → background removal, all in one session, ending with a transparent PNG ready to drop into a design.
**Turn your own photo into an ad**
> Here's my product photo — turn it into a 6-second cinematic ad with a luxury mood.
Upload the reference, then the cinematic product-ad tool animates it into a commercial clip.
**Build a mini brand kit**
> Create a minimal wordmark logo for "Northwind Coffee", then animate it into a 3D reveal.
Logo generation → 3D logo animation, producing both a static mark and a motion intro.
**Shoot and animate a fashion look**
> Put this jacket on a model for an editorial shoot, then turn the best still into a 6-second campaign clip.
Fashion Studio composes the shoot, then animates the chosen still using a matching video template.
**Build a UGC-style ad from a product photo**
> Here's my product — create a UGC-style ad with an avatar, 9:16, 15 seconds.
Ad Studio resolves the product and avatar, applies the UGC format, and generates the finished vertical ad.
## How to connect
There are three ways to connect, depending on your client:
* **From a directory** — in ChatGPT and Manus, ImagineArt is listed in the client's own plugin or connector directory. Install it and sign in; there's nothing to paste.
* **As a custom connector** — in Claude and Grok, paste the server URL `https://mcp.imagine.art` into the client's connector settings.
* **With one command** — the `@imagineartofficial/mcp` npm package includes an installer that writes the server into your client's config for you:
```bash theme={null}
npm i -g @imagineartofficial/mcp
imagine install
```
`imagine install` sets up eleven clients: Claude, Claude Code, Cursor, Codex, VS Code, Windsurf, Cline, Gemini CLI, Hermes, OpenClaw, and Grok. It opens your browser once so you can sign in.
### Let your agent set it up
Each client on the MCP page has a **Copy and send this to** box with a ready-made setup prompt. Click **Copy**, paste it into your agent, and it installs and connects Imagine MCP for you. For example, the Claude Code prompt is:
```text theme={null}
Set up ImagineArt for me so I can generate images, video and music from here.
1. Install the CLI: run npm i -g @imagineartofficial/mcp.
2. Add the server to Claude Code: run imagine install claude-code. It opens my browser to sign in: tell me when it needs me, and wait. If it stops because something is missing, install that and run it again.
3. Tell me it is ready, and what I need to type in Claude Code to pick up the new config.
```
The prompt for other clients is the same, with the client's name and its `imagine install` value swapped in: `chatgpt`, `claude`, `claude-code`, `cursor`, `grok`, `manus`, `codex`, `hermes`, `openclaw`, or `cli` for a plain terminal.
### ChatGPT
ImagineArt is in the ChatGPT plugin directory, so there's no URL to paste.
On the MCP page, select **ChatGPT** and click **Connect In ChatGPT**. This opens the ImagineArt plugin in ChatGPT.
Install the plugin, then connect your imagine.art account when ChatGPT asks.
Type `@ImagineArt` and ask for anything.
 ### Claude
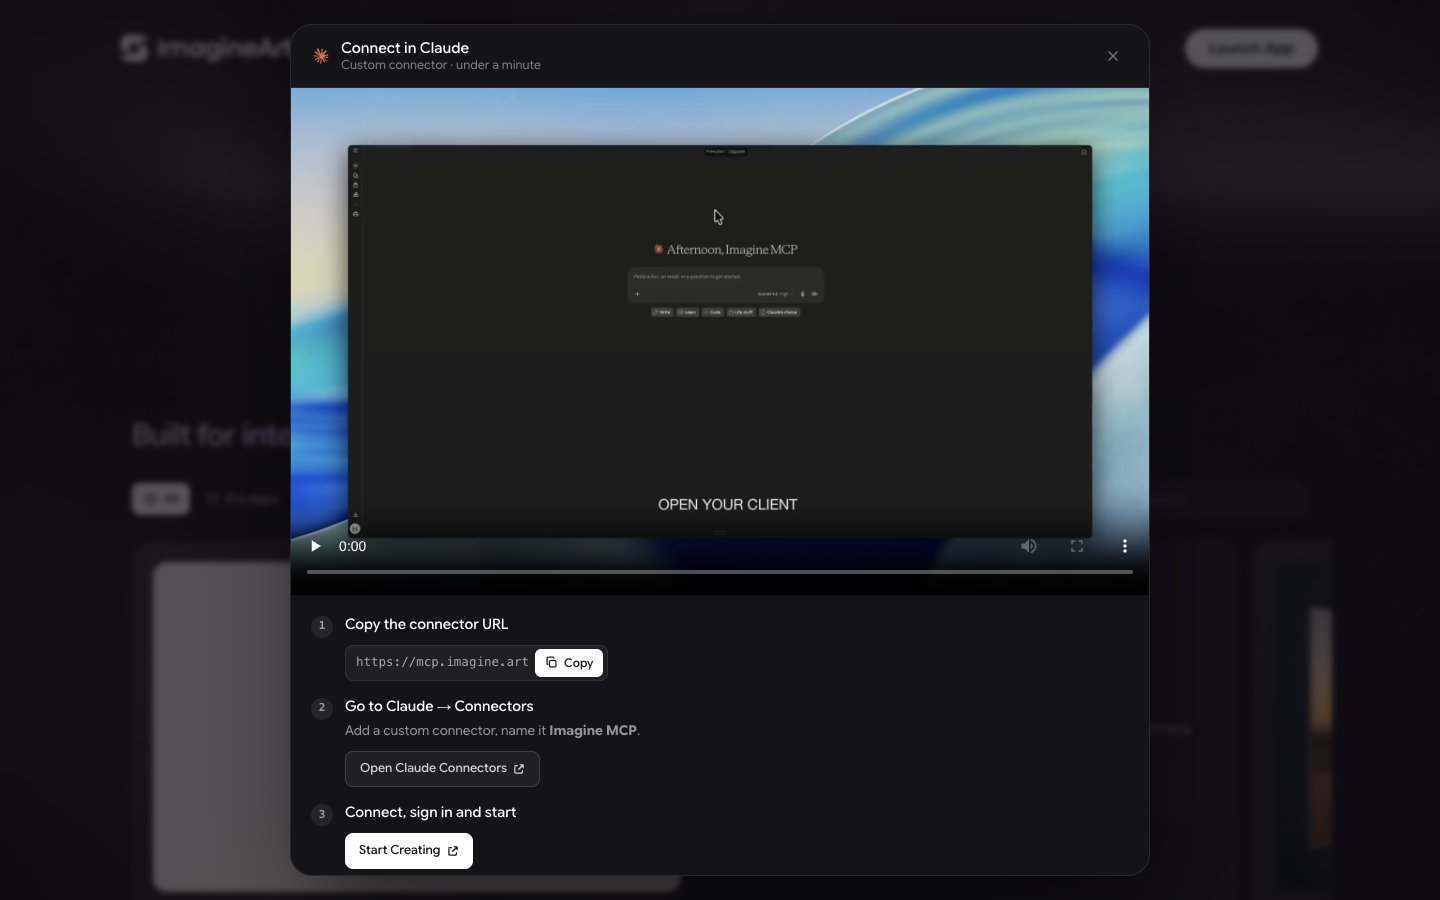
On the MCP page, select **Claude** and copy the server URL: `https://mcp.imagine.art`
Click **Connect In Claude** to open Claude's connector settings, or go to **Settings → Connectors → Add custom connector** yourself. Name it `Imagine MCP` and paste the URL.
Click **Add → Connect**, sign in with your imagine.art account, then ask Claude to generate an image.
### Claude
On the MCP page, select **Claude** and copy the server URL: `https://mcp.imagine.art`
Click **Connect In Claude** to open Claude's connector settings, or go to **Settings → Connectors → Add custom connector** yourself. Name it `Imagine MCP` and paste the URL.
Click **Add → Connect**, sign in with your imagine.art account, then ask Claude to generate an image.
 Prefer the terminal? Run `npm i -g @imagineartofficial/mcp && imagine install claude` to add the server with one command instead.
### Cursor
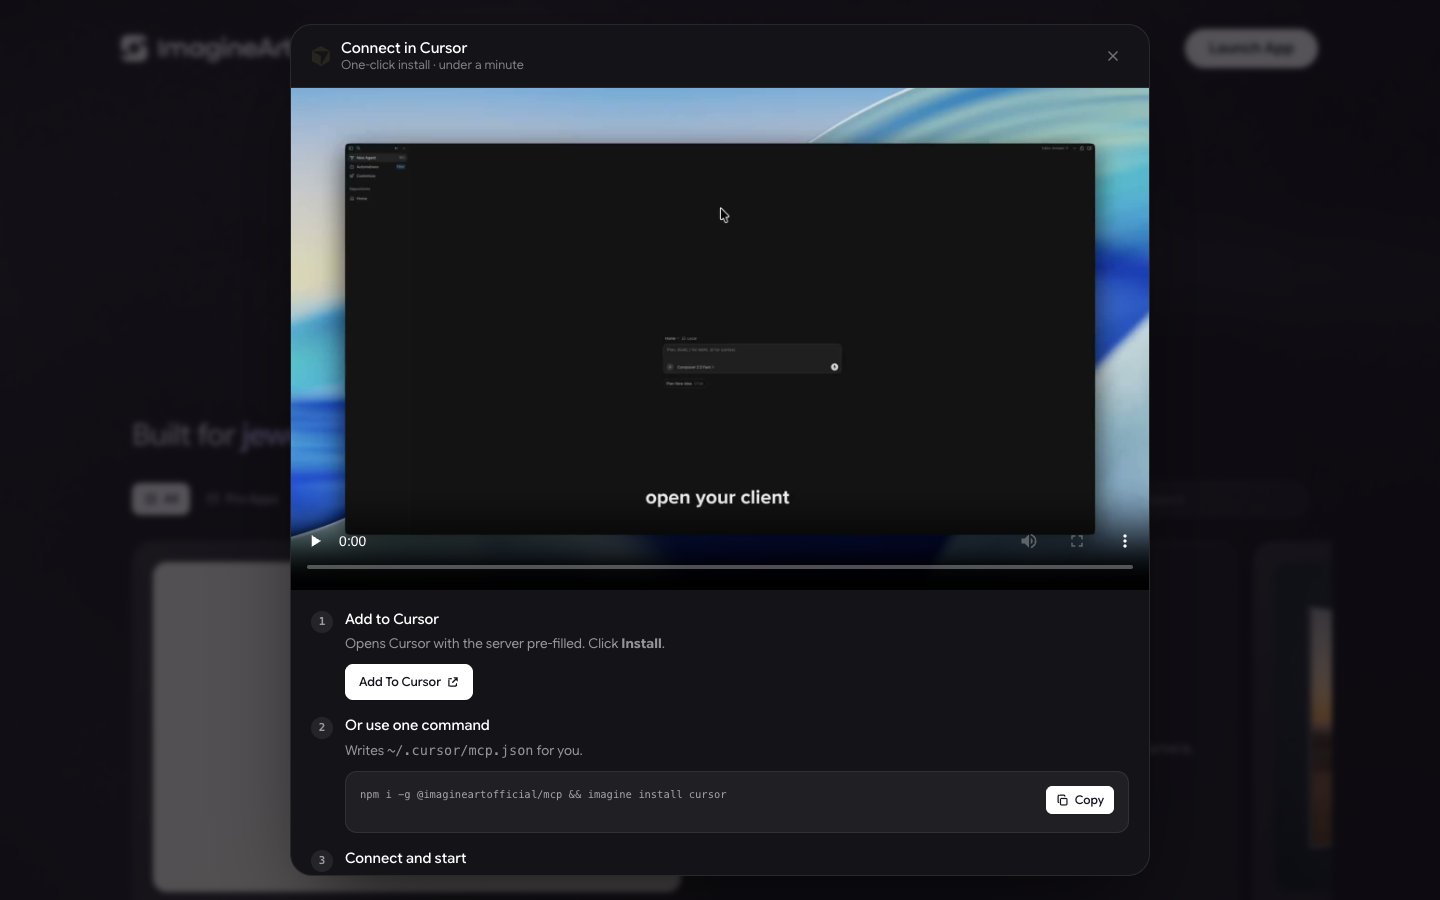
On the MCP page, select **Cursor** and click **Connect In Cursor** (or **Add To Cursor** in the **How To Connect?** guide). Cursor opens with the server pre-filled. Click **Install**.
Run this in your terminal. It writes `~/.cursor/mcp.json` for you:
```bash theme={null}
npm i -g @imagineartofficial/mcp && imagine install cursor
```
Cursor signs in on first use. Then ask the agent to generate a hero image — it picks the right tool.
Prefer the terminal? Run `npm i -g @imagineartofficial/mcp && imagine install claude` to add the server with one command instead.
### Cursor
On the MCP page, select **Cursor** and click **Connect In Cursor** (or **Add To Cursor** in the **How To Connect?** guide). Cursor opens with the server pre-filled. Click **Install**.
Run this in your terminal. It writes `~/.cursor/mcp.json` for you:
```bash theme={null}
npm i -g @imagineartofficial/mcp && imagine install cursor
```
Cursor signs in on first use. Then ask the agent to generate a hero image — it picks the right tool.
 To add the server by hand, go to **Settings → MCP → Add new MCP server**, or edit `~/.cursor/mcp.json` directly, and add:
```json theme={null}
{
"mcpServers": {
"ImagineArt": {
"type": "http",
"url": "https://mcp.imagine.art"
}
}
}
```
Save and restart Cursor. It asks you to sign in with your imagine.art account the first time it uses the server.
### Grok
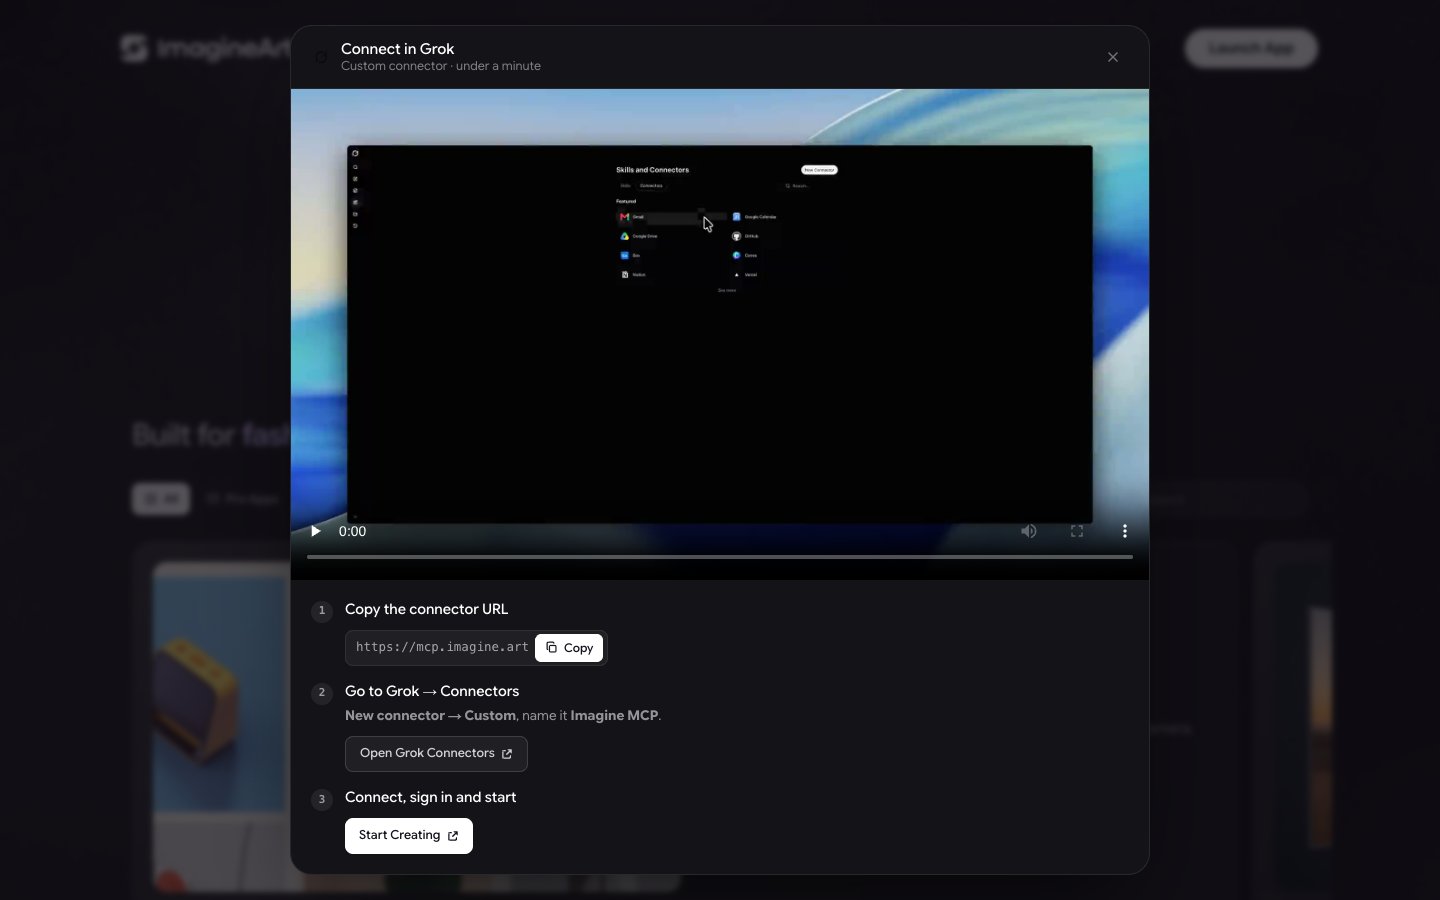
On the MCP page, select **Grok** and copy the server URL: `https://mcp.imagine.art`
Click **Connect In Grok** to open Grok's connector settings. Click **New connector → Custom** and name it `Imagine MCP`, then paste the URL.
Connect, sign in with your imagine.art account, and start creating.
To add the server by hand, go to **Settings → MCP → Add new MCP server**, or edit `~/.cursor/mcp.json` directly, and add:
```json theme={null}
{
"mcpServers": {
"ImagineArt": {
"type": "http",
"url": "https://mcp.imagine.art"
}
}
}
```
Save and restart Cursor. It asks you to sign in with your imagine.art account the first time it uses the server.
### Grok
On the MCP page, select **Grok** and copy the server URL: `https://mcp.imagine.art`
Click **Connect In Grok** to open Grok's connector settings. Click **New connector → Custom** and name it `Imagine MCP`, then paste the URL.
Connect, sign in with your imagine.art account, and start creating.
 ### Manus
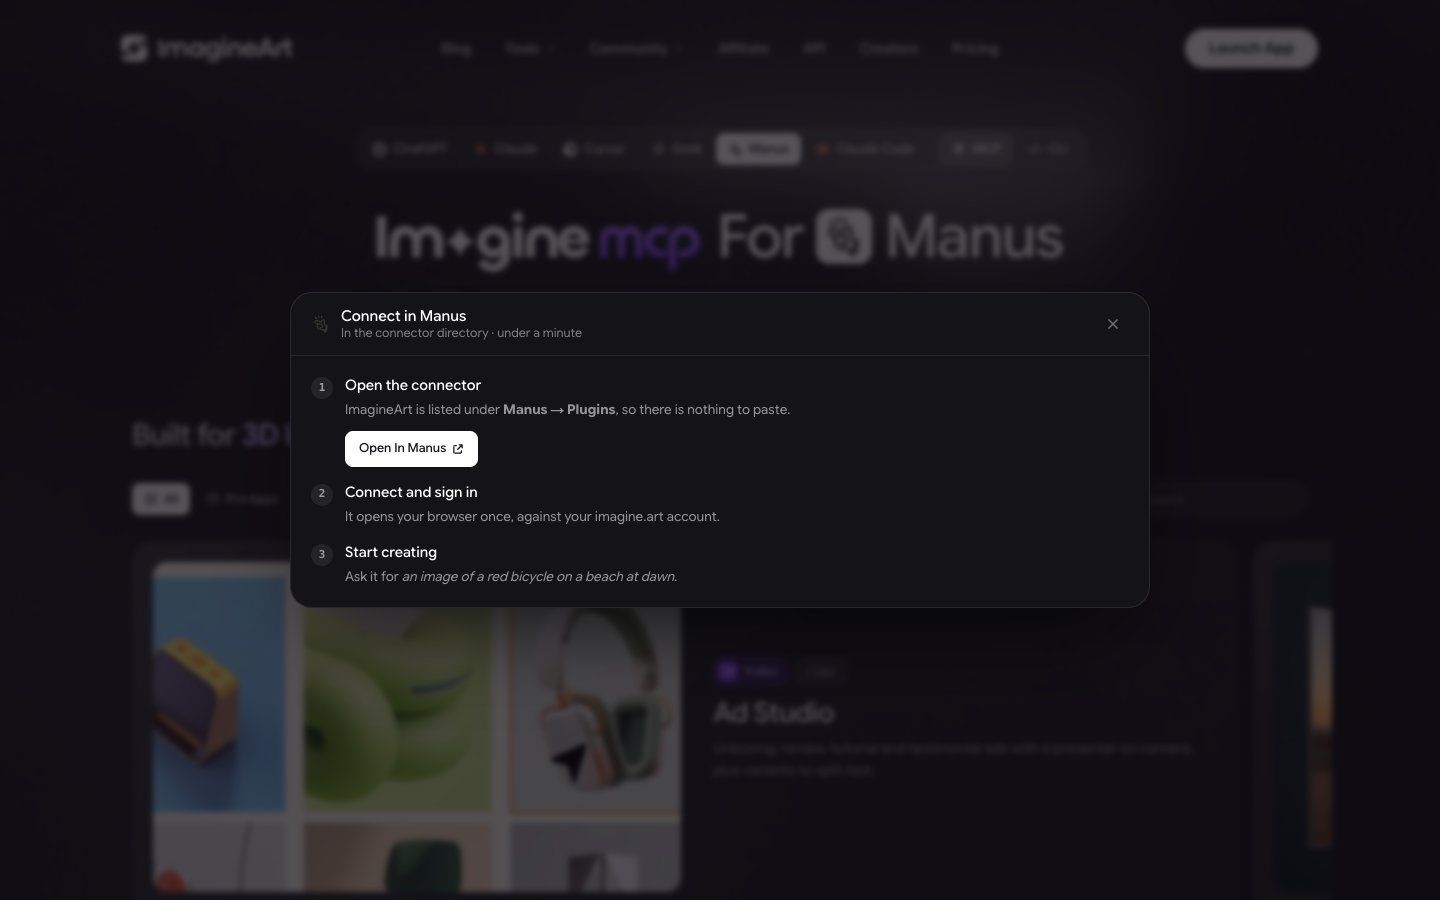
ImagineArt is an official connector in Manus. It's listed under **Manus → Plugins**, so there's nothing to paste.
On the MCP page, select **Manus** and click **Connect In Manus**. This opens the ImagineArt connector in Manus.
Connect the connector. It opens your browser once to sign in with your imagine.art account.
Ask it for an image of a red bicycle on a beach at dawn.
### Manus
ImagineArt is an official connector in Manus. It's listed under **Manus → Plugins**, so there's nothing to paste.
On the MCP page, select **Manus** and click **Connect In Manus**. This opens the ImagineArt connector in Manus.
Connect the connector. It opens your browser once to sign in with your imagine.art account.
Ask it for an image of a red bicycle on a beach at dawn.
 ### Claude Code
Claude Code connects with the installer. In your terminal, run:
```bash theme={null}
npm i -g @imagineartofficial/mcp
imagine install claude-code
```
It opens your browser to sign in with your imagine.art account. You can also paste the Claude Code setup prompt from [Let your agent set it up](#let-your-agent-set-it-up) into Claude Code and let it run these steps for you.
### Codex
Codex connects with the installer. In your terminal, run:
```bash theme={null}
npm i -g @imagineartofficial/mcp
imagine install codex
```
It opens your browser to sign in with your imagine.art account. Codex is listed on the **CLI** tab of the MCP page.
### VS Code, Windsurf, Cline, and Gemini CLI
These clients don't have their own tab on the MCP page, but the installer supports them. Run `npm i -g @imagineartofficial/mcp`, then `imagine install` followed by your client's name. Any other client that speaks MCP can connect by adding `https://mcp.imagine.art` as a server in its settings.
### OpenClaw
The fastest way to connect OpenClaw is the installer:
```bash theme={null}
npm i -g @imagineartofficial/mcp
imagine install openclaw
```
It opens your browser to sign in with your imagine.art account. OpenClaw is listed on the **CLI** tab of the MCP page.
To add the server with OpenClaw's own commands instead, make sure OpenClaw is installed, updated (`openclaw update`), and running. Then:
```bash theme={null}
# Add the server
openclaw mcp add imagine --url https://mcp.imagine.art --transport streamable-http --auth oauth --timeout 180 --connect-timeout 60
# Sign in (opens an authorization URL)
openclaw mcp login imagine
openclaw mcp login imagine --code 'YOUR_CODE'
# Load the new tools into running agents
openclaw mcp reload
```
**Authorizing:** `login` prints an `https://imagine.art/mcp/authorize?...` URL. Open it, approve access, then copy only the value between `code=` and `&` from the redirect (the "site can't be reached" page is normal). Wrap the code in single quotes so a stray `&` can't break the command. Codes expire in about 1–2 minutes — re-run `login` for a fresh one if needed.
```bash theme={null}
# Inspect
openclaw mcp status --verbose # list saved servers + auth state (no network call)
openclaw mcp show imagine # show this server's raw config
openclaw mcp probe imagine # connect and list tools (makes the network call)
# Maintain / reset
openclaw mcp configure imagine --timeout 180 --connect-timeout 60
openclaw mcp logout imagine # clear stored credentials (keeps the server)
openclaw mcp unset imagine # remove the server entirely
```
A healthy `status` shows `authorized` and `tokens=yes`. A probe should report the full tool list.
### Hermes
The fastest way to connect Hermes is the installer:
```bash theme={null}
npm i -g @imagineartofficial/mcp
imagine install hermes
```
It opens your browser to sign in with your imagine.art account. Then type `hermes` and start generating. Hermes is listed on the **CLI** tab of the MCP page.
Open a terminal and run:
```bash theme={null}
hermes mcp add ImagineArt --url "https://mcp.imagine.art"
```
For `Does this server require authentication? [Y/n]:`, type `Y` and then paste your bearer token.
When Hermes asks whether to enable all tools, type `y`.
Then type `hermes` and start generating.
## Imagine CLI
The Imagine CLI lets you generate straight from your terminal. You name the tool yourself, and the file is saved to the folder you're in — no agent in the loop. It's scriptable, so you can use it in your own scripts and CI jobs.
Imagine MCP and the Imagine CLI are the same tools reached two ways, and one npm package ships both. With Imagine MCP, you ask your agent in plain language and it picks the tool. With the CLI, you run a command like `imagine image` or `imagine video`.
To open the CLI page, click the **CLI** tab on the MCP page. Its client picker lists **Terminal, Codex, Claude Code, Hermes**, and **OpenClaw**.
### Claude Code
Claude Code connects with the installer. In your terminal, run:
```bash theme={null}
npm i -g @imagineartofficial/mcp
imagine install claude-code
```
It opens your browser to sign in with your imagine.art account. You can also paste the Claude Code setup prompt from [Let your agent set it up](#let-your-agent-set-it-up) into Claude Code and let it run these steps for you.
### Codex
Codex connects with the installer. In your terminal, run:
```bash theme={null}
npm i -g @imagineartofficial/mcp
imagine install codex
```
It opens your browser to sign in with your imagine.art account. Codex is listed on the **CLI** tab of the MCP page.
### VS Code, Windsurf, Cline, and Gemini CLI
These clients don't have their own tab on the MCP page, but the installer supports them. Run `npm i -g @imagineartofficial/mcp`, then `imagine install` followed by your client's name. Any other client that speaks MCP can connect by adding `https://mcp.imagine.art` as a server in its settings.
### OpenClaw
The fastest way to connect OpenClaw is the installer:
```bash theme={null}
npm i -g @imagineartofficial/mcp
imagine install openclaw
```
It opens your browser to sign in with your imagine.art account. OpenClaw is listed on the **CLI** tab of the MCP page.
To add the server with OpenClaw's own commands instead, make sure OpenClaw is installed, updated (`openclaw update`), and running. Then:
```bash theme={null}
# Add the server
openclaw mcp add imagine --url https://mcp.imagine.art --transport streamable-http --auth oauth --timeout 180 --connect-timeout 60
# Sign in (opens an authorization URL)
openclaw mcp login imagine
openclaw mcp login imagine --code 'YOUR_CODE'
# Load the new tools into running agents
openclaw mcp reload
```
**Authorizing:** `login` prints an `https://imagine.art/mcp/authorize?...` URL. Open it, approve access, then copy only the value between `code=` and `&` from the redirect (the "site can't be reached" page is normal). Wrap the code in single quotes so a stray `&` can't break the command. Codes expire in about 1–2 minutes — re-run `login` for a fresh one if needed.
```bash theme={null}
# Inspect
openclaw mcp status --verbose # list saved servers + auth state (no network call)
openclaw mcp show imagine # show this server's raw config
openclaw mcp probe imagine # connect and list tools (makes the network call)
# Maintain / reset
openclaw mcp configure imagine --timeout 180 --connect-timeout 60
openclaw mcp logout imagine # clear stored credentials (keeps the server)
openclaw mcp unset imagine # remove the server entirely
```
A healthy `status` shows `authorized` and `tokens=yes`. A probe should report the full tool list.
### Hermes
The fastest way to connect Hermes is the installer:
```bash theme={null}
npm i -g @imagineartofficial/mcp
imagine install hermes
```
It opens your browser to sign in with your imagine.art account. Then type `hermes` and start generating. Hermes is listed on the **CLI** tab of the MCP page.
Open a terminal and run:
```bash theme={null}
hermes mcp add ImagineArt --url "https://mcp.imagine.art"
```
For `Does this server require authentication? [Y/n]:`, type `Y` and then paste your bearer token.
When Hermes asks whether to enable all tools, type `y`.
Then type `hermes` and start generating.
## Imagine CLI
The Imagine CLI lets you generate straight from your terminal. You name the tool yourself, and the file is saved to the folder you're in — no agent in the loop. It's scriptable, so you can use it in your own scripts and CI jobs.
Imagine MCP and the Imagine CLI are the same tools reached two ways, and one npm package ships both. With Imagine MCP, you ask your agent in plain language and it picks the tool. With the CLI, you run a command like `imagine image` or `imagine video`.
To open the CLI page, click the **CLI** tab on the MCP page. Its client picker lists **Terminal, Codex, Claude Code, Hermes**, and **OpenClaw**.
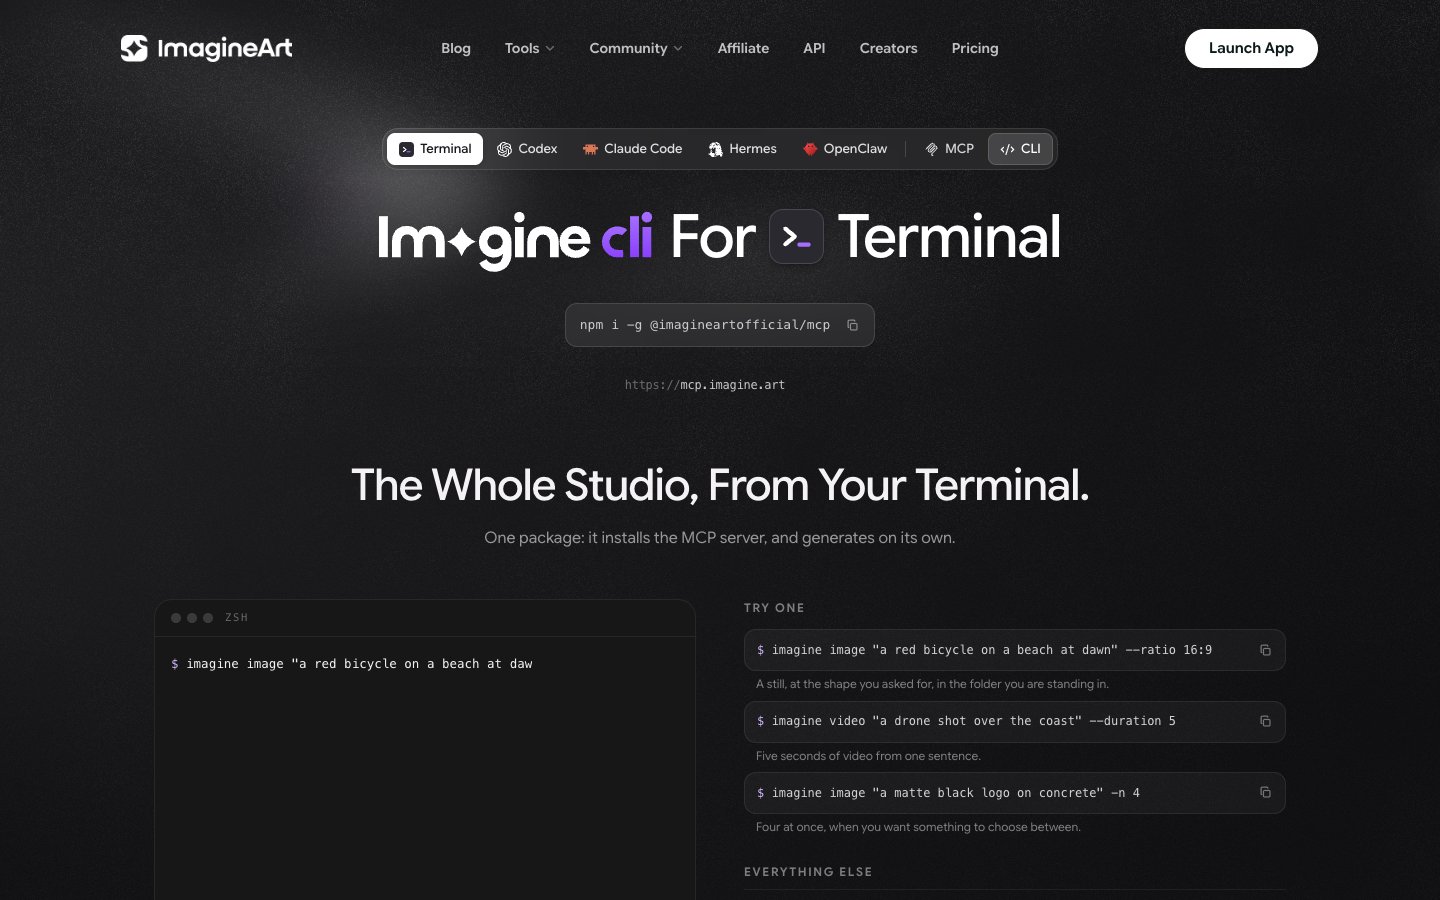 ```bash theme={null}
npm i -g @imagineartofficial/mcp
```
The package needs Node 20 or later.
Run `imagine install cli`. It opens your browser so you can sign in with your imagine.art account.
Try a command:
```bash theme={null}
imagine image "a red bicycle on a beach at dawn" --ratio 16:9
```
The image is saved to the folder you're in.
### Example commands
| Command | What it does |
| - | - |
| `imagine image "a red bicycle on a beach at dawn" --ratio 16:9` | A still, at the aspect ratio you asked for, in the folder you're in |
| `imagine video "a drone shot over the coast" --duration 5` | Five seconds of video from one sentence |
| `imagine image "a matte black logo on concrete" -n 4` | Four images at once, when you want something to choose between |
### Command reference
```bash theme={null}
npm i -g @imagineartofficial/mcp
```
The package needs Node 20 or later.
Run `imagine install cli`. It opens your browser so you can sign in with your imagine.art account.
Try a command:
```bash theme={null}
imagine image "a red bicycle on a beach at dawn" --ratio 16:9
```
The image is saved to the folder you're in.
### Example commands
| Command | What it does |
| - | - |
| `imagine image "a red bicycle on a beach at dawn" --ratio 16:9` | A still, at the aspect ratio you asked for, in the folder you're in |
| `imagine video "a drone shot over the coast" --duration 5` | Five seconds of video from one sentence |
| `imagine image "a matte black logo on concrete" -n 4` | Four images at once, when you want something to choose between |
### Command reference
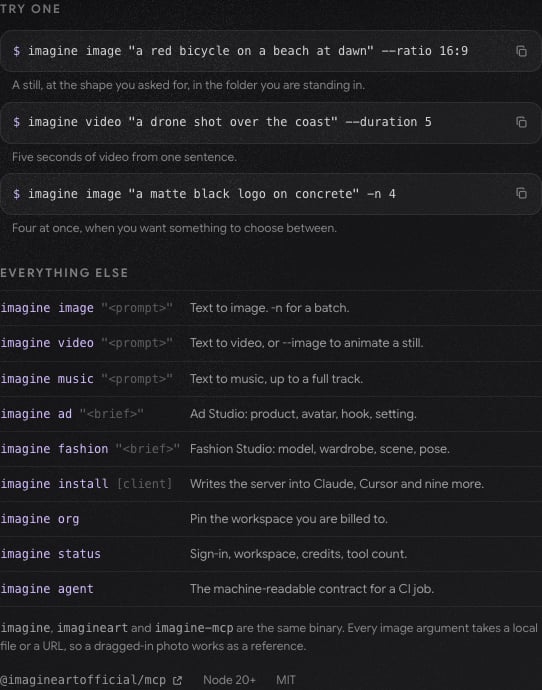 | Command | What it does |
| - | - |
| `imagine image ""` | Text to image. Add `-n` for a batch. |
| `imagine video ""` | Text to video, or add `--image` to animate a still. |
| `imagine music ""` | Text to music, up to a full track. |
| `imagine ad ""` | Ad Studio: product, avatar, hook, setting. |
| `imagine fashion ""` | Fashion Studio: model, wardrobe, scene, pose. |
| `imagine install [client]` | Writes the server into Claude, Cursor, and nine more clients. |
| `imagine org` | Pins the workspace you're billed to. |
| `imagine status` | Shows your sign-in, workspace, credits, and tool count. |
| `imagine agent` | The machine-readable contract for a CI job. |
`imagine`, `imagineart`, and `imagine-mcp` are the same command. Every image argument takes a local file or a URL, so you can use a photo on your computer as a reference.
## Security and privacy
* **Your account is the only key** — authentication runs through your existing imagine.art login. No shared API keys, no separate credentials to secure.
* **Tokens stay local** — your client stores the OAuth token on your machine and refreshes it automatically.
* **Your creations stay in your workspace** — content you generate through a connected agent is saved to your ImagineArt workspace and stays there until you delete it. ImagineArt doesn't receive your conversation with the agent, only what the agent sends with each request, and doesn't use your prompts, uploads, or generated content to train AI models. See [Imagine MCP and connected AI assistants](/policies/privacy-policy#imagine-mcp-and-connected-ai-assistants) in the Privacy Policy.
* **Trust only your own sign-in** — never approve an authorization link or paste a code that came from anything other than your own client's login command.
## Troubleshooting
| Symptom | Cause | Fix |
| - | - | - |
| Browser shows "This site can't be reached" after approving | Normal — nothing serves the local callback page | Ignore it; copy the `code` from the address bar |
| Login never finishes / command suspends | You included `&state=...`; the `&` backgrounded the command | Copy only up to the `&`, wrap the code in single quotes |
| `code is expired / invalid` | Auth codes expire in about 1–2 min | Re-run login, re-approve, use the fresh code |
| `Request timed out` (-32001) | The streaming connection is being dropped or slowed | Use generous timeouts; switch off VPN/proxy or try a stable network |
| Agent receives messages but never replies | Its language model is out of credits/keys | Top up or switch the agent's model |
| Ad generation fails citing an invalid format | A format name (for example, "UGC") was passed instead of its numeric id | Look up the id via the format list, or use the format picker, and retry |
| New project silently reuses an old one | Duplicate project names in the same folder | Rename projects distinctly, or select by creation date in the picker |
| Generation stalls or fails on credits | Organization credit balance exhausted | Check balance and top up, or switch organizations |
| Newly created avatar/product "not found" | Its id wasn't picked up from the picker's response | Re-select from the picker rather than reusing an old id |
**Connection vs. model:** a working ImagineArt connection only means the tools are available. Your agent still needs a working language model (with credits) to drive the conversation and decide to call those tools.
## FAQ
It uses the Model Context Protocol, an open standard that gives AI agents access to external tools. Once connected, your agent can generate images, create videos, produce music, upscale assets, remove backgrounds, run fashion photoshoots, build ads, and check your balance — all within a single conversation.
Any client that speaks MCP, including custom setups running locally or on a server. In ChatGPT and Manus, ImagineArt is in the client's own directory — install it, connect your imagine.art account, and start creating. In Claude on the web and Grok, paste the server URL into the connector settings. The `imagine install` command sets up eleven clients for you: Claude, Claude Code, Cursor, Codex, VS Code, Windsurf, Cline, Gemini CLI, Hermes, OpenClaw, and Grok.
They're the same tools reached two ways, and one npm package (`@imagineartofficial/mcp`) ships both. Imagine MCP is the server your agent talks to, so you ask in plain language and the agent picks the tool. The Imagine CLI is for your terminal, where you name the tool yourself: `imagine image`, `imagine video`, `imagine music`, `imagine ad`, `imagine fashion`. Use the CLI when you want a file on disk in one line, scriptable and without an agent in the loop. See [Imagine CLI](#imagine-cli).
96 tools, all callable directly in the conversation. Seven cover most requests: text-to-image, text-to-video, music, fashion photoshoots, upscaling, background removal, and your credit balance. The rest are tuned to specific jobs, plus tools that manage your products, avatars, models, and wardrobes. See [Available tools](#available-tools).
No. Add the server URL in your agent's settings and authenticate through your imagine.art account over OAuth. Your agent opens a browser once to sign in, and the credentials stay on your own machine. No keys to generate, store, or rotate.
Imagine MCP uses the same credit system as the platform. Each generation costs credits based on the tool and model selected, drawn from your existing plan. Check your balance and renewal date anytime with the balance tool.
Images typically complete in a few seconds. Videos take longer depending on duration and model. Generation runs asynchronously — your agent polls for results and delivers them the moment they're ready.
Images up to 4K, short video clips (length depends on the model), and original music tracks of around thirty seconds — all from a single prompt, plus full fashion photoshoots and ad campaigns through the studio workflows. You can chain tools in sequence within one agent session.
Yes. Fashion Studio composes a model, wardrobe, scene, and pose into finished photoshoots or short campaign videos. Ad Studio turns a product and an avatar into a finished ad, image or video, using a format, hook, and setting. Fashion Studio generation is limited to paid organizations.
This documentation is built and hosted on [Mintlify](https://mintlify.com), a developer documentation platform.
| Command | What it does |
| - | - |
| `imagine image ""` | Text to image. Add `-n` for a batch. |
| `imagine video ""` | Text to video, or add `--image` to animate a still. |
| `imagine music ""` | Text to music, up to a full track. |
| `imagine ad ""` | Ad Studio: product, avatar, hook, setting. |
| `imagine fashion ""` | Fashion Studio: model, wardrobe, scene, pose. |
| `imagine install [client]` | Writes the server into Claude, Cursor, and nine more clients. |
| `imagine org` | Pins the workspace you're billed to. |
| `imagine status` | Shows your sign-in, workspace, credits, and tool count. |
| `imagine agent` | The machine-readable contract for a CI job. |
`imagine`, `imagineart`, and `imagine-mcp` are the same command. Every image argument takes a local file or a URL, so you can use a photo on your computer as a reference.
## Security and privacy
* **Your account is the only key** — authentication runs through your existing imagine.art login. No shared API keys, no separate credentials to secure.
* **Tokens stay local** — your client stores the OAuth token on your machine and refreshes it automatically.
* **Your creations stay in your workspace** — content you generate through a connected agent is saved to your ImagineArt workspace and stays there until you delete it. ImagineArt doesn't receive your conversation with the agent, only what the agent sends with each request, and doesn't use your prompts, uploads, or generated content to train AI models. See [Imagine MCP and connected AI assistants](/policies/privacy-policy#imagine-mcp-and-connected-ai-assistants) in the Privacy Policy.
* **Trust only your own sign-in** — never approve an authorization link or paste a code that came from anything other than your own client's login command.
## Troubleshooting
| Symptom | Cause | Fix |
| - | - | - |
| Browser shows "This site can't be reached" after approving | Normal — nothing serves the local callback page | Ignore it; copy the `code` from the address bar |
| Login never finishes / command suspends | You included `&state=...`; the `&` backgrounded the command | Copy only up to the `&`, wrap the code in single quotes |
| `code is expired / invalid` | Auth codes expire in about 1–2 min | Re-run login, re-approve, use the fresh code |
| `Request timed out` (-32001) | The streaming connection is being dropped or slowed | Use generous timeouts; switch off VPN/proxy or try a stable network |
| Agent receives messages but never replies | Its language model is out of credits/keys | Top up or switch the agent's model |
| Ad generation fails citing an invalid format | A format name (for example, "UGC") was passed instead of its numeric id | Look up the id via the format list, or use the format picker, and retry |
| New project silently reuses an old one | Duplicate project names in the same folder | Rename projects distinctly, or select by creation date in the picker |
| Generation stalls or fails on credits | Organization credit balance exhausted | Check balance and top up, or switch organizations |
| Newly created avatar/product "not found" | Its id wasn't picked up from the picker's response | Re-select from the picker rather than reusing an old id |
**Connection vs. model:** a working ImagineArt connection only means the tools are available. Your agent still needs a working language model (with credits) to drive the conversation and decide to call those tools.
## FAQ
It uses the Model Context Protocol, an open standard that gives AI agents access to external tools. Once connected, your agent can generate images, create videos, produce music, upscale assets, remove backgrounds, run fashion photoshoots, build ads, and check your balance — all within a single conversation.
Any client that speaks MCP, including custom setups running locally or on a server. In ChatGPT and Manus, ImagineArt is in the client's own directory — install it, connect your imagine.art account, and start creating. In Claude on the web and Grok, paste the server URL into the connector settings. The `imagine install` command sets up eleven clients for you: Claude, Claude Code, Cursor, Codex, VS Code, Windsurf, Cline, Gemini CLI, Hermes, OpenClaw, and Grok.
They're the same tools reached two ways, and one npm package (`@imagineartofficial/mcp`) ships both. Imagine MCP is the server your agent talks to, so you ask in plain language and the agent picks the tool. The Imagine CLI is for your terminal, where you name the tool yourself: `imagine image`, `imagine video`, `imagine music`, `imagine ad`, `imagine fashion`. Use the CLI when you want a file on disk in one line, scriptable and without an agent in the loop. See [Imagine CLI](#imagine-cli).
96 tools, all callable directly in the conversation. Seven cover most requests: text-to-image, text-to-video, music, fashion photoshoots, upscaling, background removal, and your credit balance. The rest are tuned to specific jobs, plus tools that manage your products, avatars, models, and wardrobes. See [Available tools](#available-tools).
No. Add the server URL in your agent's settings and authenticate through your imagine.art account over OAuth. Your agent opens a browser once to sign in, and the credentials stay on your own machine. No keys to generate, store, or rotate.
Imagine MCP uses the same credit system as the platform. Each generation costs credits based on the tool and model selected, drawn from your existing plan. Check your balance and renewal date anytime with the balance tool.
Images typically complete in a few seconds. Videos take longer depending on duration and model. Generation runs asynchronously — your agent polls for results and delivers them the moment they're ready.
Images up to 4K, short video clips (length depends on the model), and original music tracks of around thirty seconds — all from a single prompt, plus full fashion photoshoots and ad campaigns through the studio workflows. You can chain tools in sequence within one agent session.
Yes. Fashion Studio composes a model, wardrobe, scene, and pose into finished photoshoots or short campaign videos. Ad Studio turns a product and an avatar into a finished ad, image or video, using a format, hook, and setting. Fashion Studio generation is limited to paid organizations.
This documentation is built and hosted on [Mintlify](https://mintlify.com), a developer documentation platform.