> ## Documentation Index
> Fetch the complete documentation index at: https://docs.imagine.art/llms.txt
> Use this file to discover all available pages before exploring further.
# Lookbook shoots
> Generate a full lookbook — every outfit in every pose — in one run.
A Lookbook shoot is Fashion Studio's batch mode. Instead of shooting one look at a time, you put one model in several outfits and several poses, and Fashion Studio generates every combination in a single run. Reach for it when you need a whole collection shot consistently: a seasonal lookbook, a line sheet, or a full drop for your store.
Go to [imagine.art/fashion-studio](https://imagine.art/fashion-studio) and click **Lookbook** under **Tools**. This opens a new project in the Lookbook editor.
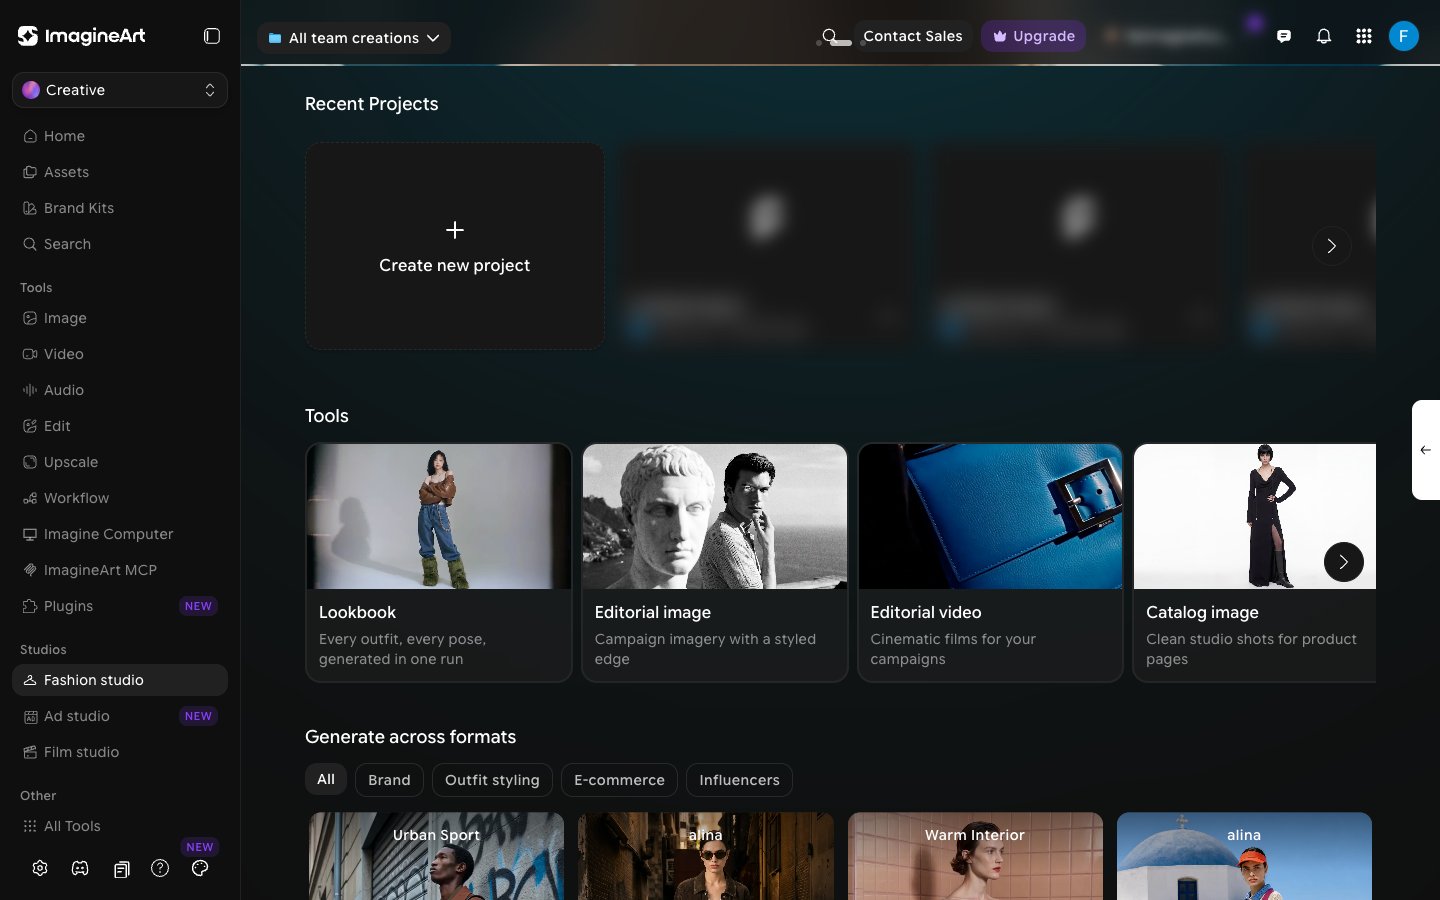 Already in a project? Click the shoot mode name at the top of the left panel and choose **Lookbook**. The same menu switches back to **Catalogue Shoot** or **Editorial Shoot**.
Under **Model**, pick the [model](/fashion-studio/models) who will wear every look. One model appears across the whole lookbook.
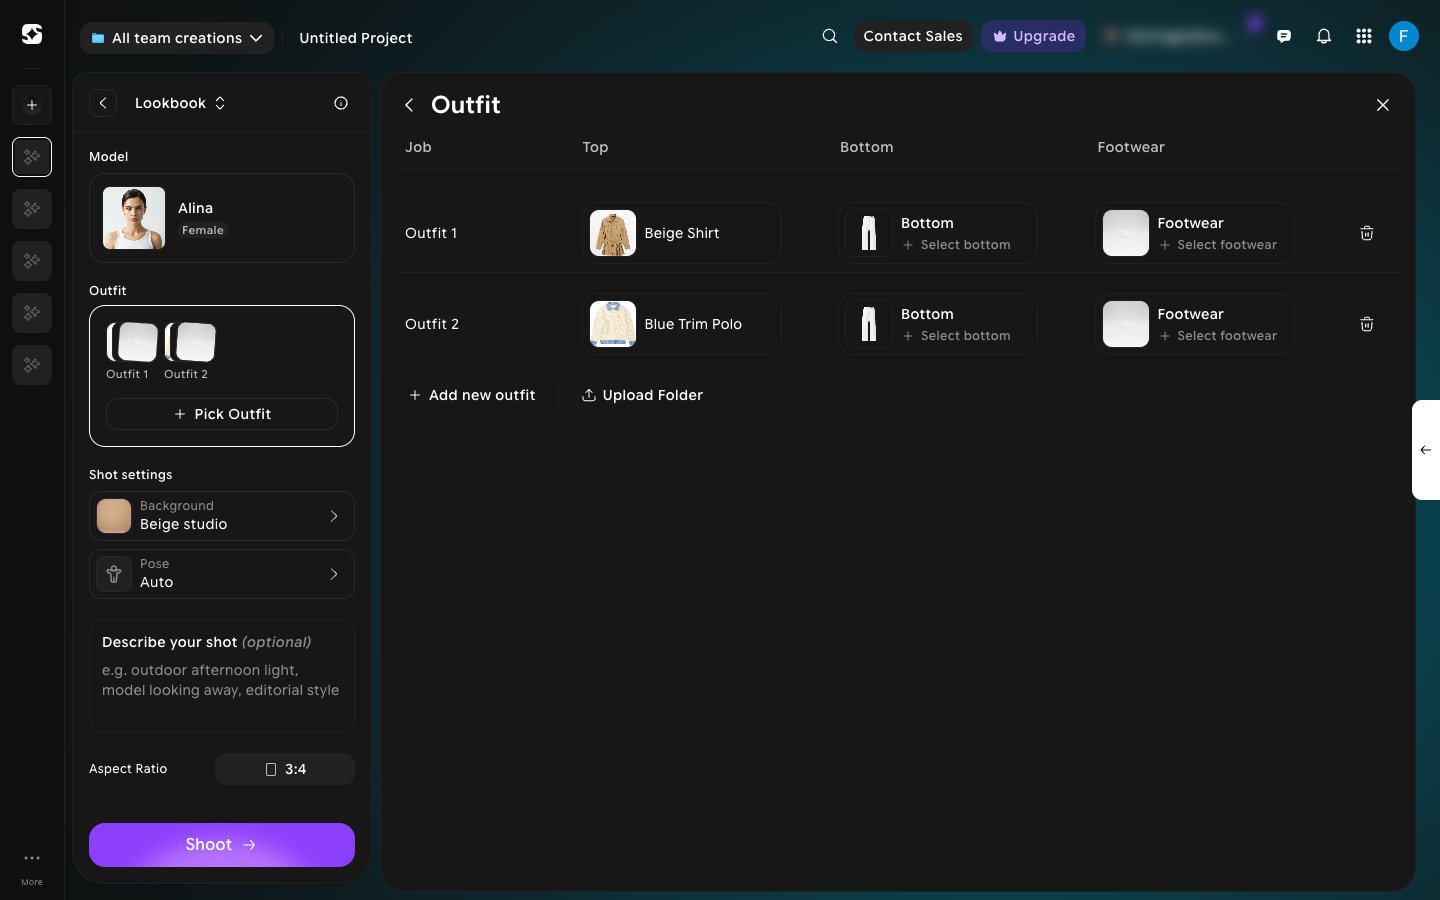
Under **Outfit**, click **Pick Outfit**. Each row in the **Outfit** panel is one look, with slots for **Top**, **Bottom**, and **Footwear**. Click a slot to choose a garment from the library, or click **Create New** in the picker to add your own (see [Choosing an outfit](/fashion-studio/choosing-an-outfit)).
* Click **Add new outfit** to add another look.
* Click **Upload Folder** to bring in garments from a folder.
* Click the trash icon at the end of a row to remove that look.
Already in a project? Click the shoot mode name at the top of the left panel and choose **Lookbook**. The same menu switches back to **Catalogue Shoot** or **Editorial Shoot**.
Under **Model**, pick the [model](/fashion-studio/models) who will wear every look. One model appears across the whole lookbook.
Under **Outfit**, click **Pick Outfit**. Each row in the **Outfit** panel is one look, with slots for **Top**, **Bottom**, and **Footwear**. Click a slot to choose a garment from the library, or click **Create New** in the picker to add your own (see [Choosing an outfit](/fashion-studio/choosing-an-outfit)).
* Click **Add new outfit** to add another look.
* Click **Upload Folder** to bring in garments from a folder.
* Click the trash icon at the end of a row to remove that look.
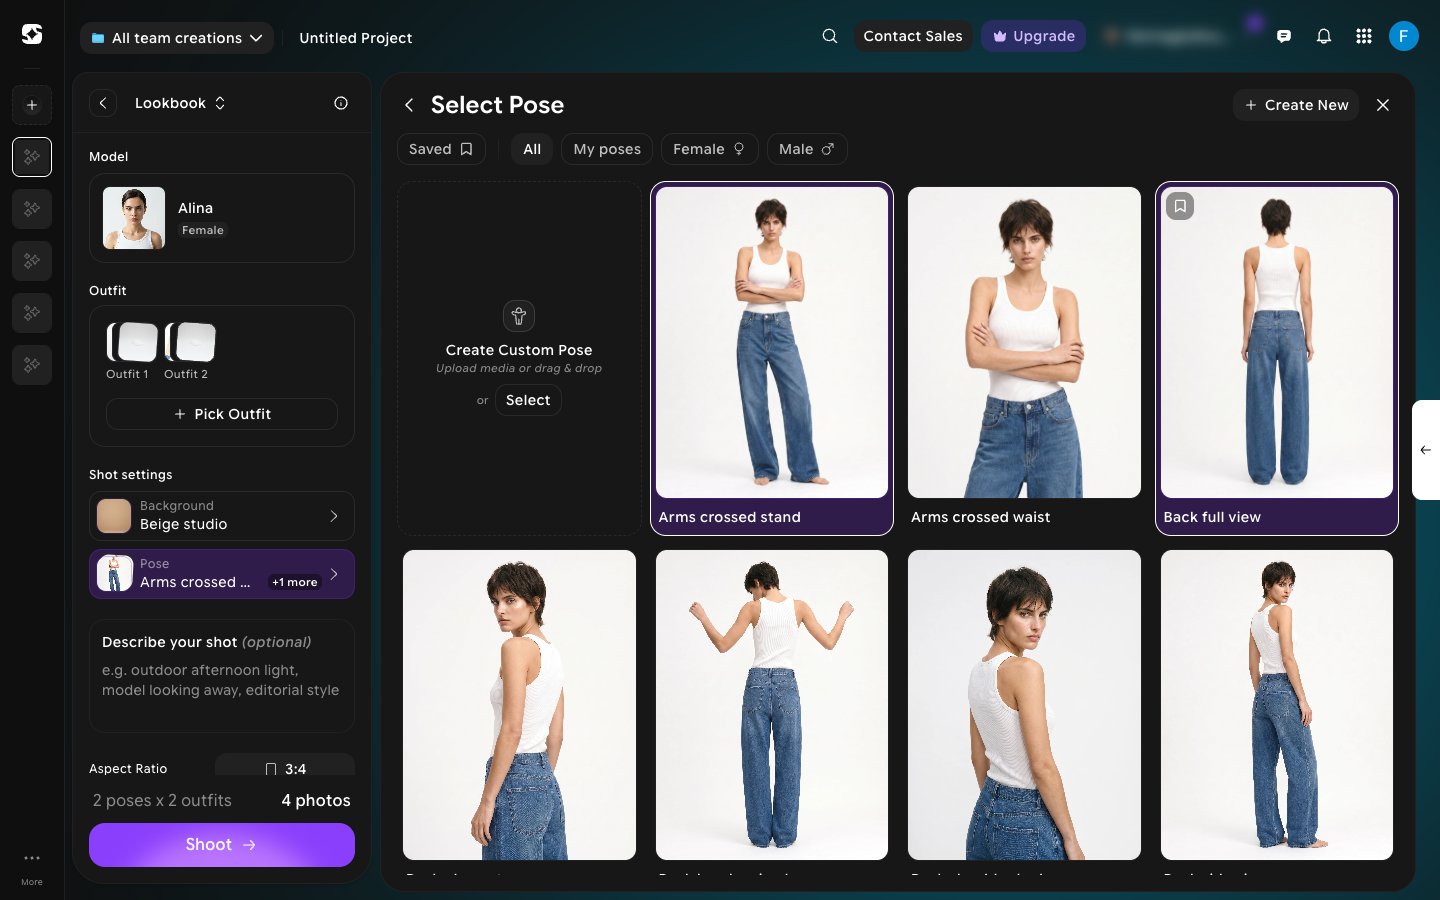
 Under **Shot settings**, click **Background** to pick the set for the shoot. Then click **Pose** and select every pose you want. In Lookbook mode you can select more than one pose. Each selected pose is outlined, and the **Pose** row shows the first one plus **+N more**.
Leave **Pose** on **Auto** to let Fashion Studio choose.
Under **Shot settings**, click **Background** to pick the set for the shoot. Then click **Pose** and select every pose you want. In Lookbook mode you can select more than one pose. Each selected pose is outlined, and the **Pose** row shows the first one plus **+N more**.
Leave **Pose** on **Auto** to let Fashion Studio choose.
 Optionally, add details in **Describe your shot**, and set the **Aspect Ratio** (**1:1**, **4:3**, **3:4**, **16:9**, **9:16**, **3:2**, **2:3**, or **21:9**).
Above **Shoot**, a summary shows the size of the batch — for example, **2 poses x 2 outfits** gives **4 photos**. Click **Shoot** to generate the whole lookbook in one run.
Optionally, add details in **Describe your shot**, and set the **Aspect Ratio** (**1:1**, **4:3**, **3:4**, **16:9**, **9:16**, **3:2**, **2:3**, or **21:9**).
Above **Shoot**, a summary shows the size of the batch — for example, **2 poses x 2 outfits** gives **4 photos**. Click **Shoot** to generate the whole lookbook in one run.
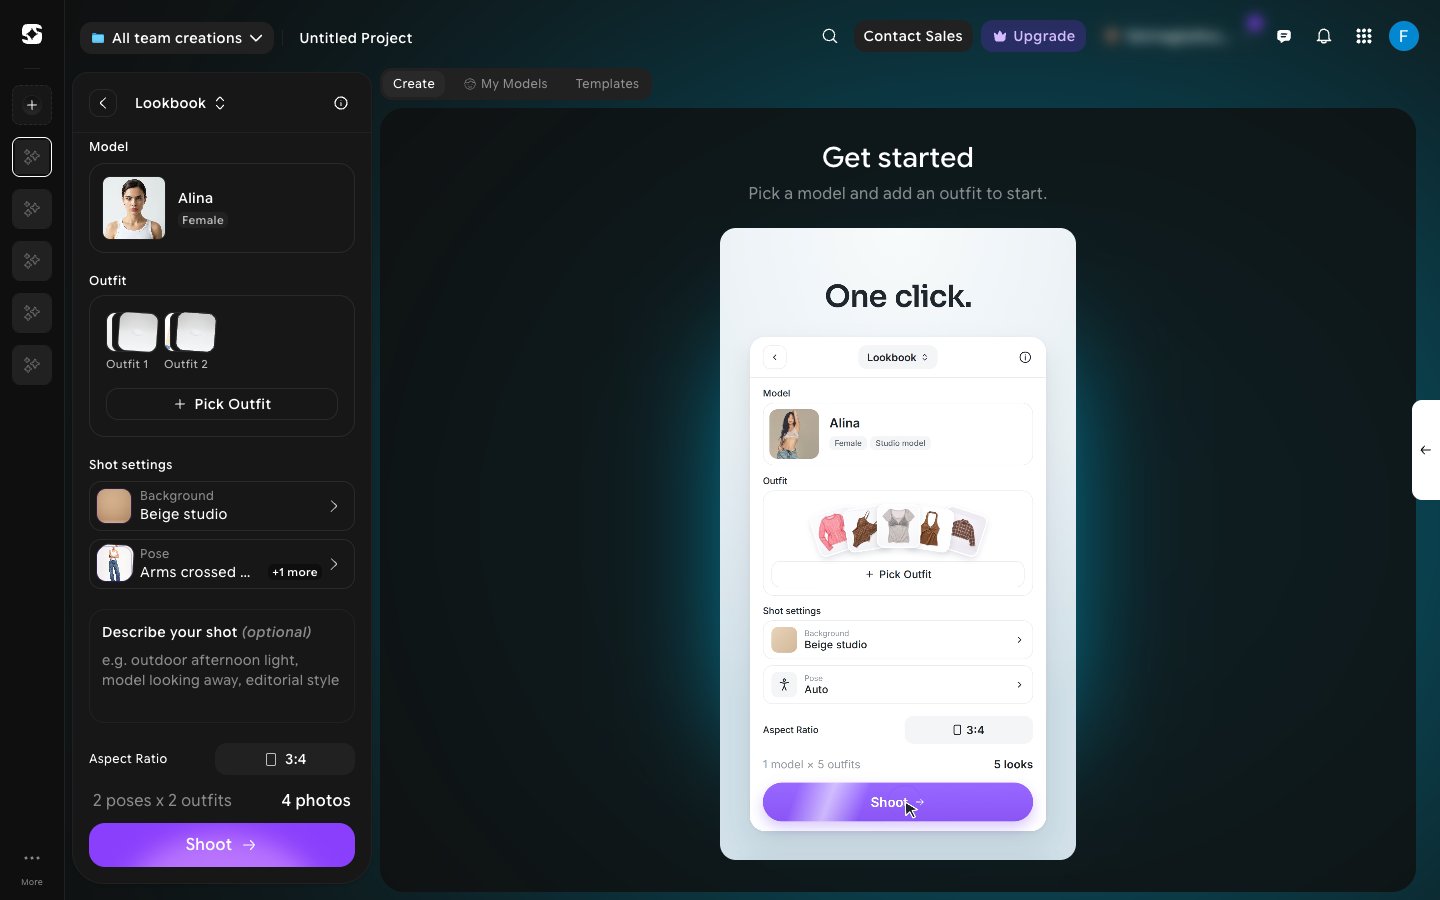 Every outfit is shot in every selected pose, so the photo count multiplies quickly. Check the summary above **Shoot** before you generate.
Want one look at a time instead? Use an [Editorial shoot](/fashion-studio/editorial-shoot) or a [Catalog shoot](/fashion-studio/catalog-shoot).
This documentation is built and hosted on [Mintlify](https://mintlify.com), a developer documentation platform.
Every outfit is shot in every selected pose, so the photo count multiplies quickly. Check the summary above **Shoot** before you generate.
Want one look at a time instead? Use an [Editorial shoot](/fashion-studio/editorial-shoot) or a [Catalog shoot](/fashion-studio/catalog-shoot).
This documentation is built and hosted on [Mintlify](https://mintlify.com), a developer documentation platform.